ADC-V515 Indoor Video Camera Guide
Welcome to Your ADC-V515 Indoor Camera! This guide will walk you through setting up your new ADC-V515 Indoor Camera, from understanding its features to connecting it to your Brinks Home™ system. We'll cover everything you need to get started, ensuring you can quickly begin enjoying its 1080p video, two-way audio, and other advanced capabilities.
Table of Contents
Click these links to jump to a specific section:
- Understanding Common Terms
- Key Specifications & Features
- Connecting to Your Wi-Fi Network
- Adding Your Camera to Your Brinks Home™ Account
- Checking Wi-Fi Signal Strength
- Troubleshooting Common Setup Issues
- Understanding the LED Light Patterns
- Explore Optional Accessories
- Getting Further Help
Understanding Common Terms
Familiarize yourself with these terms to better understand your ADC-V515 camera and this guide.
- ADC-V515
- The model number of your indoor Wi-Fi security camera.
- 1080p Resolution
- A high-definition video resolution (1920x1080 pixels) providing clear and detailed images.
- HDR (High Dynamic Range)
- A video feature that improves image quality in scenes with both very bright and very dark areas, ensuring more detail is visible in both.
- Two-Way Audio
- A feature allowing you to listen to audio from the camera's location and speak through the camera's speaker using your app.
- Night Vision
- The camera's ability to see and record images in low-light or no-light conditions, typically using infrared (IR) LEDs.
- Field of View (FOV)
- The width of the area that the camera can capture, measured in degrees.
- Wi-Fi (Wireless Fidelity)
- The wireless networking technology (standards like 802.11 b/g/n, typically on the 2.4 GHz frequency band for this camera) used to connect the camera to your internet router.
- WPS (Wi-Fi Protected Setup)
- A network security standard that allows you to easily connect Wi-Fi devices (like your camera) to your router, often with the push of a button, without needing to manually enter the Wi-Fi password.
- AP Mode (Access Point Mode)
- A temporary mode where the camera broadcasts its own Wi-Fi network. You connect your phone or computer to this network to configure the camera's connection to your main home Wi-Fi.
- MAC Address
- A unique hardware identifier for network-capable devices like your camera. Needed for some advanced network configurations or connecting in AP mode.
- Brinks Home™ App
- The mobile application (and associated website) used to view live video, manage recordings, and control your camera and security system.
- Video Analytics
- Advanced software features that can intelligently analyze video to detect specific types of events (e.g., person detection, tripwires, activity zones) to reduce false alarms and provide more meaningful alerts.
- Motion Detection
- A feature where the camera can detect movement in its field of view and trigger recordings or alerts. This can be basic pixel-based motion or more advanced Video Analytics.
- Cloud Storage
- Offsite storage for your video clips, typically provided by your alarm service provider (e.g., Alarm.com), allowing you to access recordings remotely.
- Onboard Recording / Local Recording
- The camera's ability to record video clips directly to a microSD card installed in the camera, providing a backup if cloud connection is lost or for continuous recording.
- Transformer (Power Adapter / Power Brick)
- The external power supply unit that plugs into an electrical outlet and provides the necessary DC voltage to power your camera.
- Wi-Fi Extender
- A device that repeats the wireless signal from your router to expand its coverage. This can be useful if your camera is located far from your router and has a weak Wi-Fi signal.
- VMD (Video Motion Detection)
- A common term for features that use software to detect motion in a video stream, often with configurable sensitivity and detection zones. The ADC-V515 uses this as part of its Video Analytics capabilities.
- Perimeter Guard
- An advanced Video Analytics feature that allows you to set virtual tripwires or fenced areas in the camera's view. An alert is generated if a person or object crosses these boundaries. This helps in proactively monitoring specific outdoor or indoor areas.
- LED (Light Emitting Diode)
- A small light on the camera that indicates its status (e.g., power on, connecting to Wi-Fi, recording).
Key Specifications & Features
Get to know the technical details and capabilities that make your ADC-V515 Indoor Camera a great choice for home security.
Device Overview:
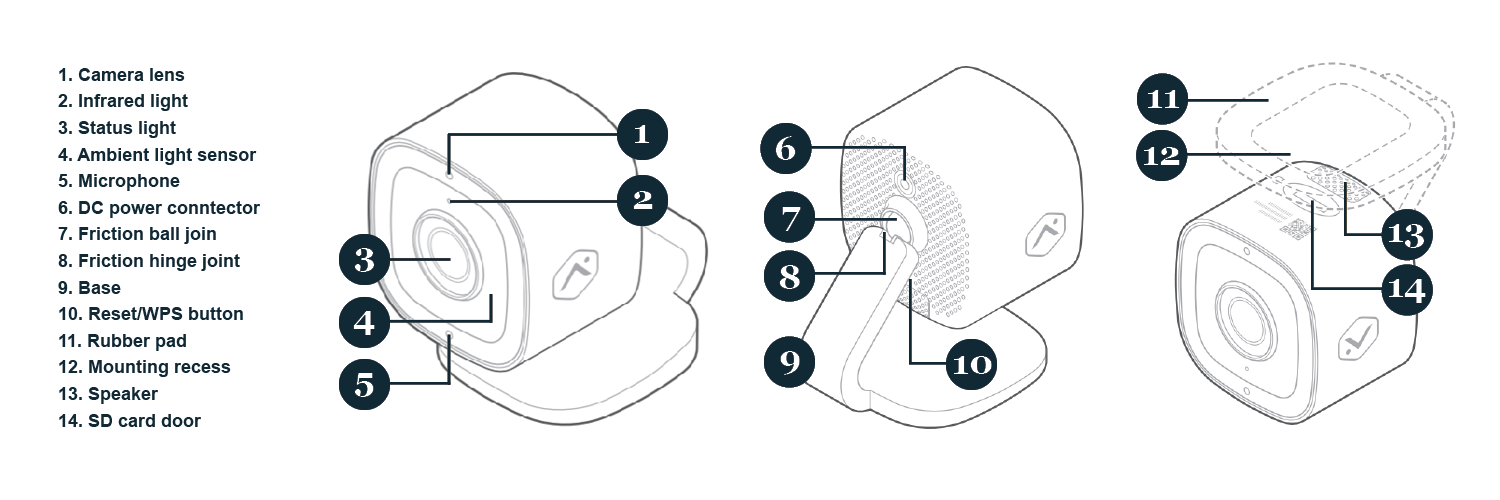
Your ADC-V515 Indoor Camera
Key Specifications:
- Video Resolution: 1920 x 1080p Full HD
- High Dynamic Range (HDR): Yes
- Field of View: 110°
- Night Vision: Up to 15 feet
- Two-Way Audio: Built-in microphone and speaker
- Wi-Fi: 802.11 b/g/n, 2.4 GHz
- Operating Temperature: 32°F to 104°F (0°C to 40°C)
Key Features:
- Seamless integration with the Brinks Home™ system.
- Remote live video streaming via the Brinks Home™ App.
- Intelligent Video Analytics for smarter motion detection (with compatible service plan).
- Cloud video storage for triggered events (with compatible service plan).
- Optional local recording to microSD card for continuous or backup recording (card not included).
- Easy wireless setup.
Connecting to Your Wi-Fi Network
The first step to using your ADC-V515 is connecting it to your home Wi-Fi network. Choose the method that works best for you. Perform these steps near the camera's intended final location to ensure good Wi-Fi signal.
Method 1: Wi-Fi Setup by WPS Enrollment (Recommended)
This is often the simplest method if your Wi-Fi router supports WPS.
- Connect the camera’s AC power adapter to a non-switched electrical outlet. Wait for the camera to power on (the LED will likely flash red during boot-up).
- Once booted (LED may be flashing red or another color indicating no Wi-Fi), press and hold the Reset/WPS button on the back of the camera until the LED starts blinking blue (about three seconds), then release. The camera is now in WPS pairing mode for approximately two minutes.
- Within these two minutes, press the WPS button on your Wi-Fi router. Look for a button labeled "WPS" or consult your router's manual if you're unsure.
- The camera will automatically connect to your Wi-Fi network. Wait for this process to finish.
- The camera's LED will turn solid green when it has successfully connected to your Wi-Fi and the internet.
Method 2: Wi-Fi Setup by AP Mode (Alternative Method)
Use this method if your router doesn't have a WPS button or if WPS setup fails.
- Connect the camera’s AC power adapter to a non-switched electrical outlet. Wait for the camera to power on.
- After about two minutes, the camera’s LED should start blinking white, indicating it’s in AP mode. If it doesn't, press and hold the Reset/WPS button until the LED blinks white (about six seconds), then release.
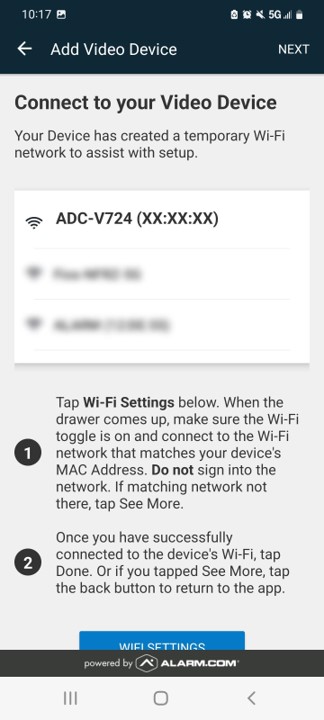
- On your smartphone, tablet, or computer, go to the Wi-Fi settings and look for a network name like "ADC-V515 (XX:XX:XX)". The "XX:XX:XX" is part of the camera's unique MAC address (found on the camera or its packaging). Connect to this network. You usually won't need a password.
- Once connected to the "ADC-V515" Wi-Fi, open a web browser and go to v515install/.
- Follow the on-screen instructions to select your home Wi-Fi network and enter its password.
- The camera will try to connect to your home Wi-Fi. Your device will disconnect from the "ADC-V515" network. Reconnect your device to your regular home Wi-Fi.
- The camera's LED will turn solid green when the connection is successful.
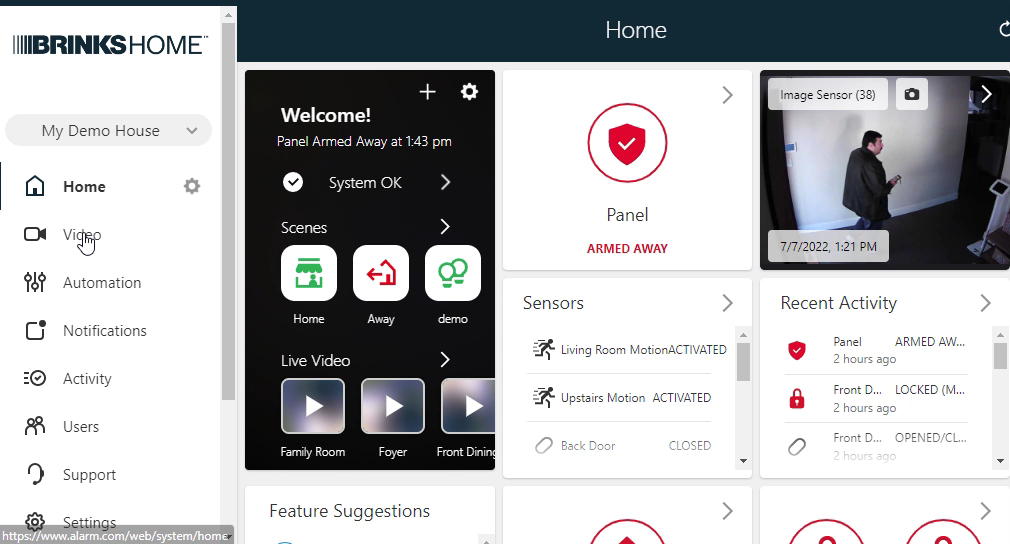
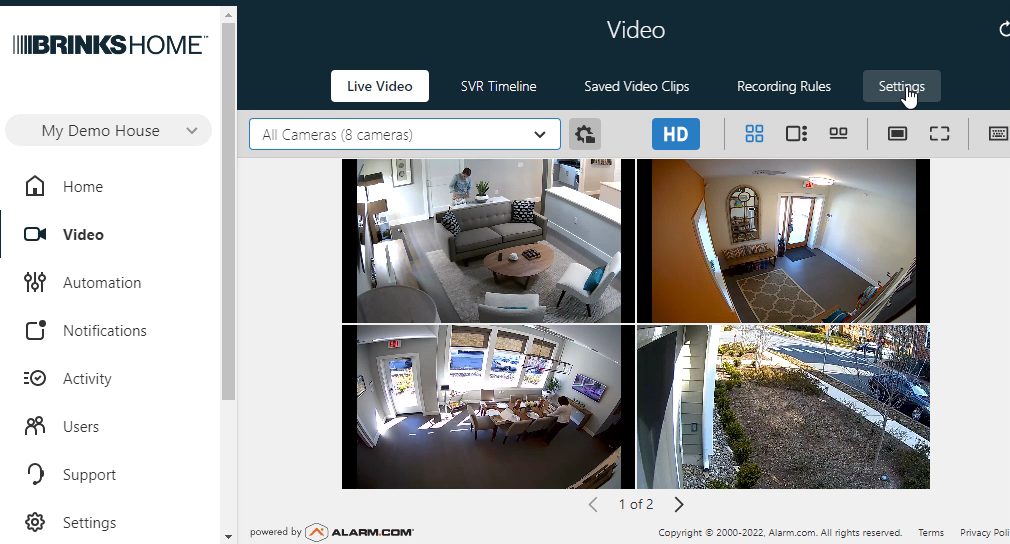
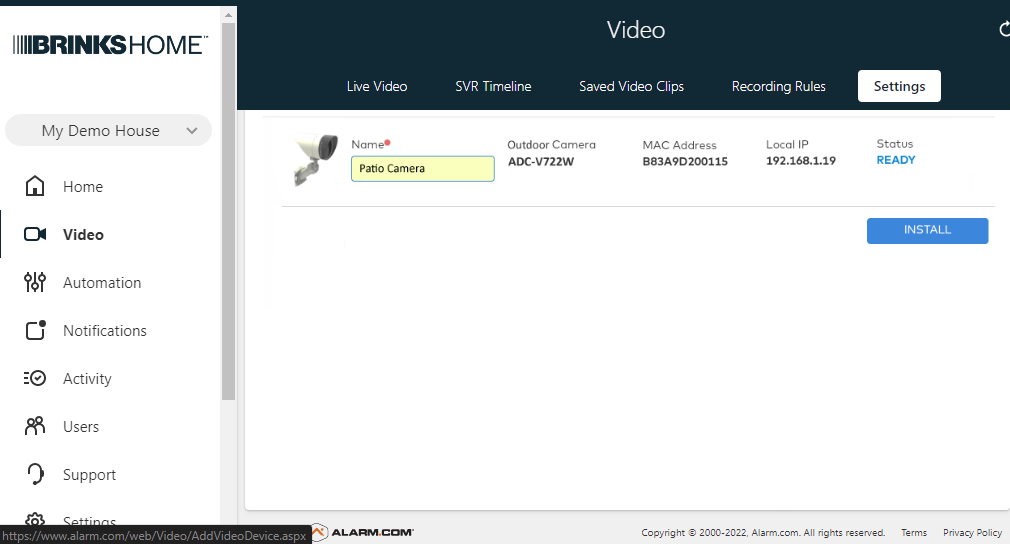
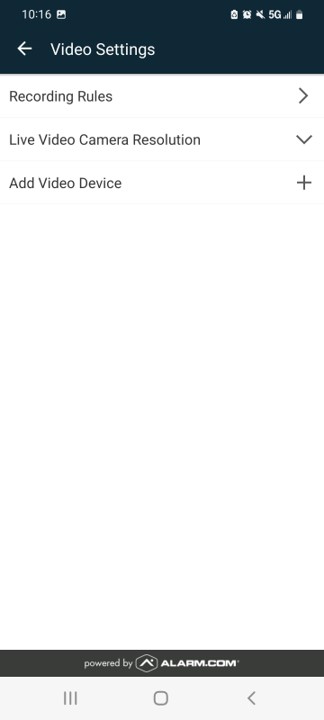
Adding Your Camera to Your Brinks Home™ Account
Once your camera is connected to your Wi-Fi (solid green LED), you need to add it to your Brinks Home™ account to view the live feed and manage settings. You can do this through the Brinks Home™ Mobile App or website.
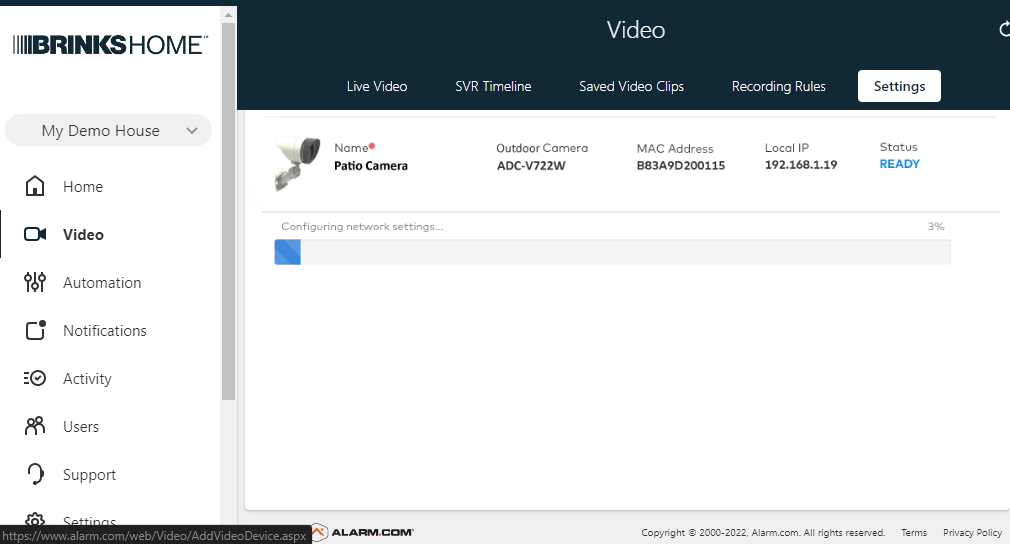
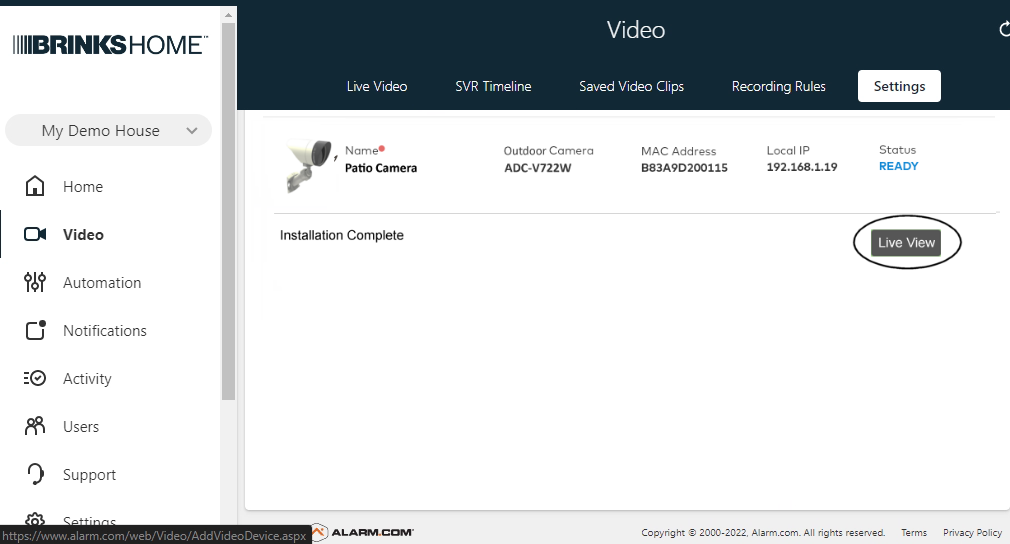
Adding via the Brinks Home™ App Website (Desktop)
-
Log in to the Brinks Home App website on a desktop browser.
-
Go to the Video section.
-
Select Settings (usually a gear icon ⚙️).
-
Click on Add Video Device.

-
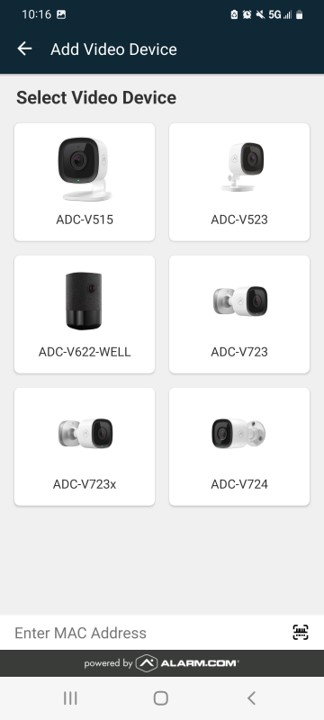
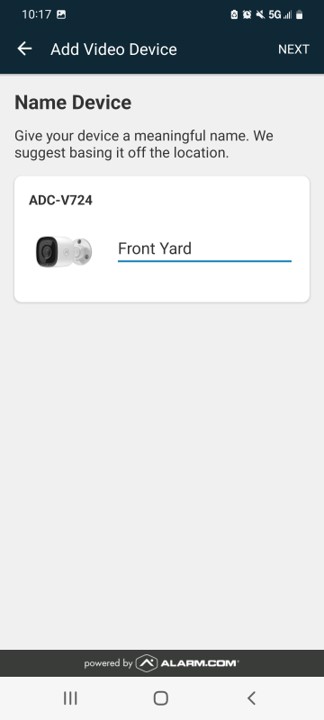
Your ADC-V515 camera should be detected. Enter a name for it and click Install or Next.
-
Wait for the camera to be configured with your account.
-
Once done, go to Live View to see your camera's feed.
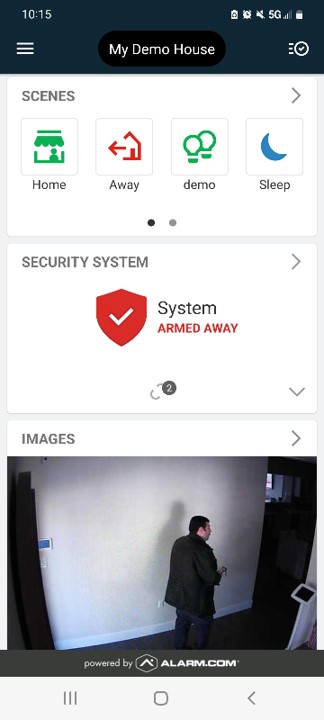
Adding via the Brinks Home™ Mobile App (Smartphone or Tablet)
-
Open the Brinks Home™ Mobile App and log in. Tap Video.
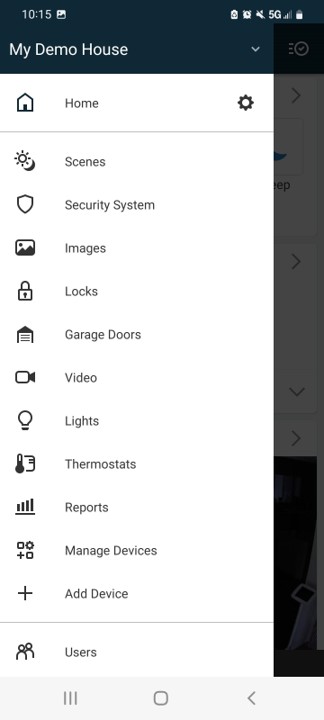
-
Tap the Settings icon (⚙️) in the top right.

-
Select Add Video Device, then choose your camera model (ADC-V515 or similar).
-
The app should find your camera. Enter a name and tap Next or Install.
-
Wait for the configuration to complete. Follow any on-screen instructions.

-
Once added, select Live View to see your camera's video feed.
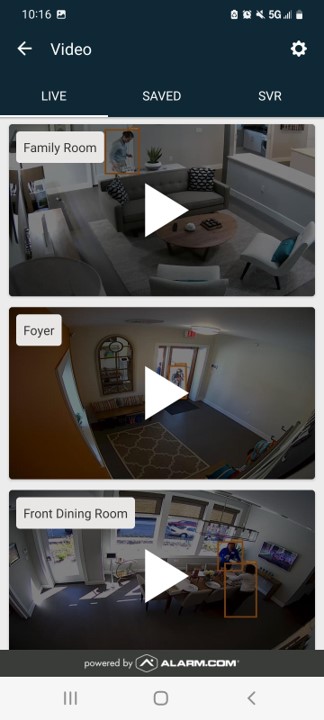
Accessing the Video Section in the Mobile App
Checking Wi-Fi Signal Strength
A strong and stable Wi-Fi connection is vital for your camera's performance. Here's how to check its signal strength using the Brinks Home™ App or website.
- Log in to your Brinks Home™ App or website.
- Navigate to the Video section.
- Go to Settings (gear icon ⚙️).
- Look for your ADC-V515 camera in the device list and select it.
- Find the Signal Strength indicator. It may be a percentage or a description (e.g., Excellent, Good, Poor).
Aim for a signal strength of at least 60% for reliable performance. If it's lower, consider moving the camera closer to your router or using a Wi-Fi extender.
Troubleshooting Common Setup Issues
If you encounter problems while setting up your ADC-V515, here are some common issues and how to resolve them.
Camera Not Connecting to Wi-Fi
- Ensure the camera is plugged in and has power. Check the LED status against the LED Reference Guide.
- Make sure your Wi-Fi router is working and you have internet access on other devices.
- Double-check that you are entering the correct Wi-Fi network name (SSID) and password.
- If using WPS, ensure you press the WPS button on your router within two minutes of activating WPS on the camera (blinking blue LED).
- If using AP mode, ensure you are connected to the correct "ADC-V515 (XX:XX:XX)" Wi-Fi network on your device before going to http://v515install.
- Try moving the camera closer to your Wi-Fi router to rule out signal range issues.
- Reboot your Wi-Fi router and then power cycle the camera (unplug for 30 seconds, then plug back in).
Camera Not Being Detected in the Brinks Home™ App/Website
- Verify that the camera has a solid green LED, indicating it's connected to your Wi-Fi and the internet. If not, go back to the Connecting to Your Wi-Fi Network section.
- Ensure your computer or mobile device is connected to the same Wi-Fi network as the camera when attempting to add it via the local network detection method.
- Try closing and reopening the Brinks Home™ App or refreshing the website page.
- Make sure your Brinks Home™ account is active and you are logged in correctly.
- If the problem persists, power cycle the camera again and wait a few minutes before attempting to add it.
Poor Video Quality or Audio Issues
- Check your camera's Wi-Fi signal strength. A weak signal is a primary cause of poor video/audio.
- Ensure your internet service has sufficient upload bandwidth. HD video streaming requires good upload speeds.
- Minimize other high-bandwidth activities on your network while testing.
- For audio issues, check app permissions for microphone access and ensure volume levels are up on both your viewing device and within the app's camera interface. Make sure the camera's microphone/speaker isn't obstructed.
Understanding the LED Light Patterns
The LED light on your ADC-V515 camera provides important information about its status. Refer to this guide to understand what the different patterns mean.
Explore Optional Accessories
Enhance the functionality and placement of your ADC-V515 camera with these optional add-ons.
- MicroSD Card: Enables local video recording directly on the camera for continuous recording or as a backup if cloud connectivity is temporarily lost. The ADC-V515 typically supports microSD cards up to 256 GB; a Class 10 or higher card is recommended for smooth video recording. Always check the latest compatibility information from the manufacturer.
- Mounting Options: While the camera includes a versatile stand, you might find optional wall or ceiling mounts that offer more flexible or secure placement in specific locations within your home.
- Power Extension Cables: If the included power adapter cable isn't long enough to reach your desired camera location from a suitable electrical outlet, you may be able to use a compatible DC power extension cable. Ensure any extension cable matches the camera's power requirements (voltage and connector type) to avoid damage or malfunction.
- Wi-Fi Range Extenders or Mesh Systems: If your camera's intended location suffers from a weak Wi-Fi signal from your main router, using a Wi-Fi extender (also known as a repeater) or upgrading your home network to a mesh Wi-Fi system can significantly improve signal strength and reliability for your camera.
Getting Further Help
If you need more assistance with your ADC-V515 Indoor Camera.
If you've followed the steps in this guide and are still experiencing issues with setting up or using your ADC-V515 camera, or if you have questions not covered here, our support team is ready to help. You can text a Support Representative anytime at 469-513-8685. Please be ready to describe the problem, the LED status of your camera, and any troubleshooting steps you have already attempted.