How to Replace the Backup Battery in Your IQ Panel 2
Summary: This guide provides step-by-step instructions for safely replacing the backup battery in your Qolsys IQ Panel 2. Using the correct replacement battery and following these procedures will ensure your panel continues to function correctly during power outages. A low battery alert may persist for up to 24 hours after installation while the new battery fully charges.
Table of Contents
Navigate through the sections to learn how to replace your IQ Panel 2's battery.
- Video Instructions
- Common Terms
- Battery Specifications and Purchasing
- Important Safety Precautions
- Battery Replacement Instructions
- Clearing Panel Alerts After Replacement
- Troubleshooting Post-Replacement Issues
- Further Assistance
Video Instructions
Watch this video for a visual guide on replacing the IQ Panel 2 battery.
Common Terms
Understanding these terms will help you during the IQ Panel 2 battery replacement.
- IQ Panel 2
- Your Qolsys touchscreen security and smart home control panel.
- Backup Battery
- The internal rechargeable battery (typically a lithium polymer 3.7V 3200mAh unit, e.g., Qolsys P/N QR0019-840) that powers your panel if AC power is lost.
- Settings Menu
- The area on the panel accessed by swiping down from the top, used to configure system options.
- Advanced Settings
- A sub-menu within Settings, usually requiring an Installer or Master Code, for more in-depth configurations like powering down the panel.
- Master Code / Installer Code
- Your primary user code or a special installer code (default often 1111 or 2222 for Qolsys) used to access advanced panel settings.
- Power Down
- Safely shutting down the panel's operating system via its software menu before physical interaction or removing power sources.
- Phillips-head Screwdriver
- A type of screwdriver needed for the small screw securing the panel's casing.
- Securing Screw / Bottom Screw
- A screw, typically at the bottom of the IQ Panel 2, that locks the front cover to the backplate.
- Front Cover / Backplate
- The main components of the panel's physical casing.
- Tabs (Bottom/Top)
- Latches or clips on the panel casing. For the IQ Panel 2, bottom tabs are often pressed to release the cover after the screw is removed, allowing it to hinge down from top tabs.
- Hanging Strap
- A plastic strap inside the panel that can be used to temporarily support the front cover when opened, preventing stress on internal ribbon cables.
- Battery Connector
- The plug that connects the battery to the panel's circuit board.
- Circuit Board
- The main electronic board inside the panel.
- Transformer (Power Supply) / AC Power
- The external device that plugs into an electrical outlet to supply main (AC) power to your panel.
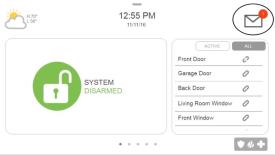
- Message Center (Message Icon) / Alerts / Alarms
- The section on your panel accessed via an icon (often an envelope) where you can view and acknowledge system notifications, including low battery or tamper alerts.
Battery Specifications and Purchasing
Information on the required battery type for your IQ Panel 2 and where to get it.
Your IQ Panel 2 requires a specific type of battery for proper operation and backup. Using an incorrect battery can damage your panel or provide insufficient backup time.
Required Battery Specifications:
- Type: Lithium Polymer (Li-Po)
- Voltage: Typically 3.7V DC
- Capacity: 3200mAh
- Example Part Number: Qolsys QR0019-840 or direct compatible.
You can often purchase this battery at local hardware stores, mass retailers, specialized battery stores, or various online retailers. To inquire about ordering one directly from us or for recommendations, you can text a Support Representative any time at 469-513-8685.
Important Safety Precautions
Read these safety tips carefully before you begin the battery replacement.
- Attempt to Disarm: If your panel is responsive, try to disarm the system before starting.
- Software Power Down First: Always use the panel's "Power Down" feature in the Advanced Settings menu before proceeding with physical disassembly.
- Disconnect External AC Power: After the panel has fully powered down via its software, ALWAYS UNPLUG THE PANEL'S MAIN AC POWER TRANSFORMER from the wall outlet before opening the panel casing or disconnecting the old battery. This is a critical safety step.
- Prevent Static Discharge: Before touching any internal components, discharge static electricity from your body by touching a grounded metal object.
- Handle Batteries with Care:
- Do not use sharp objects to pry out the battery. Use the provided pull tab if available.
- Do not pull on the battery cable itself; grip the plastic connector when unplugging.
- Do not puncture, crush, short-circuit, or expose the old or new battery to fire or high temperatures.
- Dispose of the old lithium polymer battery according to your local hazardous waste regulations.
- Use Correct Tools: A small Phillips-head screwdriver is typically needed.
- Do Not Force Components: Parts should fit smoothly. If resistance is met, re-check alignment.
Battery Replacement Instructions
Follow these detailed steps to safely replace the backup battery in your IQ Panel 2.
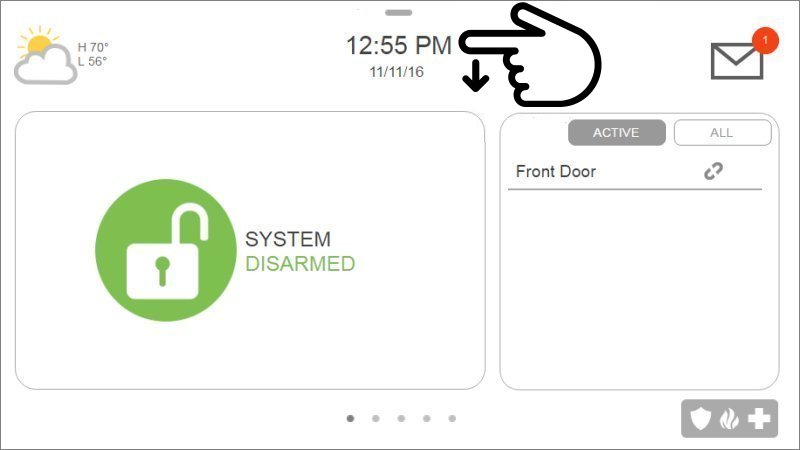
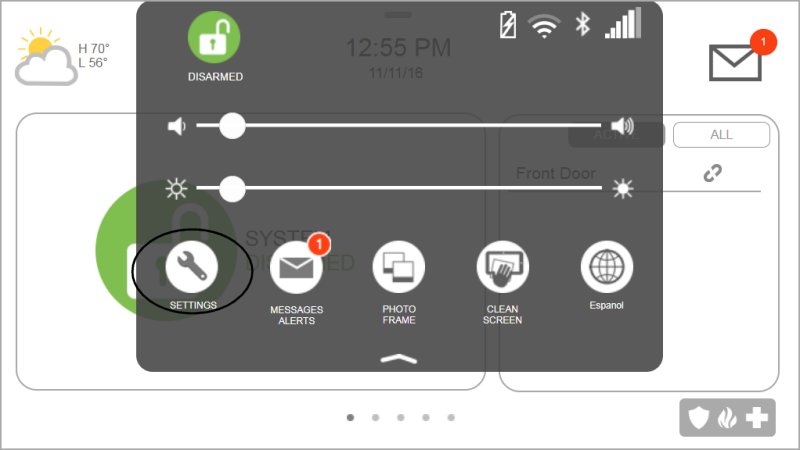
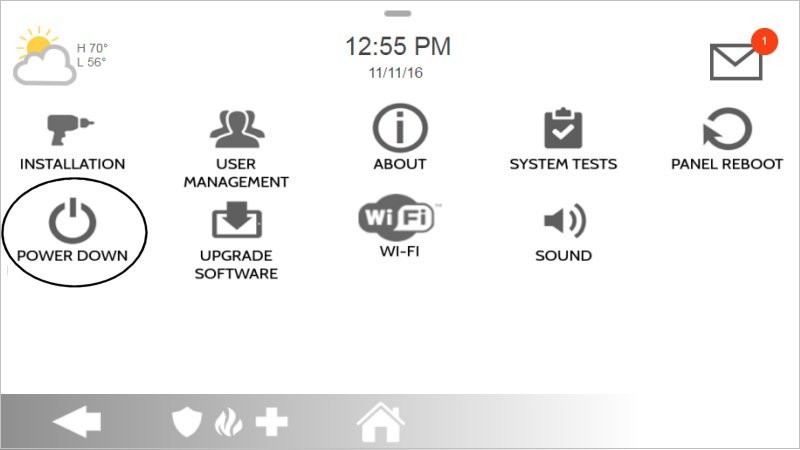
Step 1: Power Down the Panel (Software)
-
On your IQ Panel 2, swipe down from the time display at the top of the screen to open the Settings drop-down menu. Then, press the Settings (gear) icon.
-
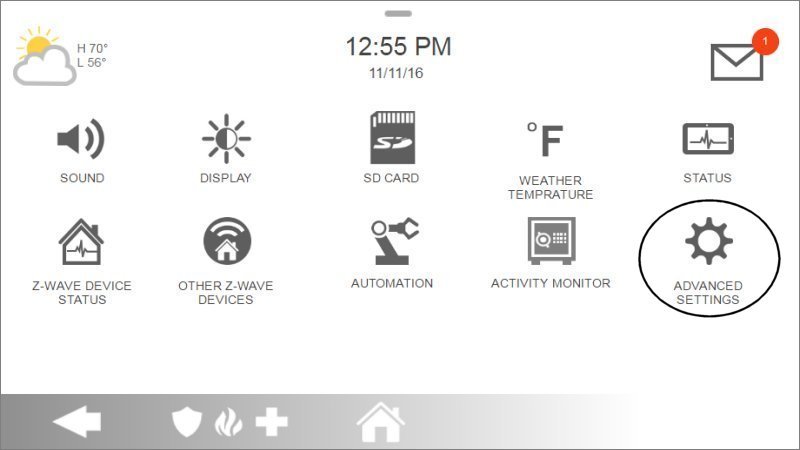
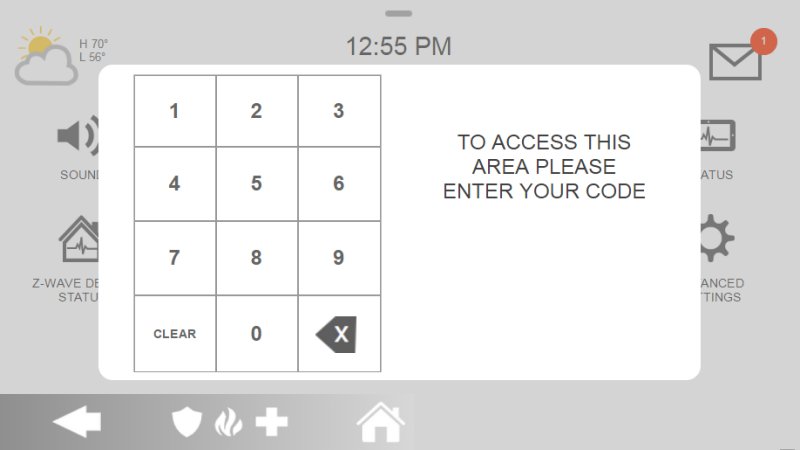
Press Advanced Settings. You will be prompted to enter a code. Enter your Master Code (or Installer Code like 1111 or 2222).
-
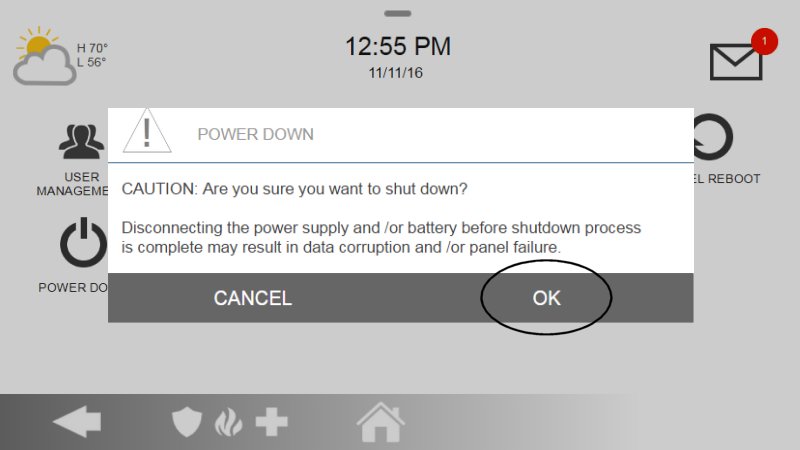
In the Advanced Settings menu, press Power Down. A confirmation message will appear. Press OK to confirm. Wait for the IQ Panel 2 to completely power down; the screen will go blank.
Step 2: Disconnect External AC Power
- Once the panel screen is blank, locate the panel's AC power transformer (plugged into a wall outlet) and unplug it.
Step 3: Open the Panel Casing
- Locate the small Phillips-head securing screw on the bottom edge of the IQ Panel 2. Use your screwdriver to remove this screw. Keep it in a safe place.
- To open the panel, the draft mentions "press both bottom tabs to remove the front cover." Alternatively, many IQ Panel 2 units have two tabs on the *top* edge. If yours has top tabs, press these down firmly while gently pulling the top of the panel forward; it should swing downwards, hinging from the bottom. If it has bottom release tabs as described in your draft, press those to release the front cover from the backplate. Adapt to your panel's specific mechanism, and do not force it.

Step 4: Secure Panel and Disconnect Old Battery
- Once the panel is open, use the plastic hanging strap to hook the front cover onto the backplate. This supports the cover while you work.
- Locate the battery. Unplug its connector from the circuit board. Grip the plastic connector, not the wires.
- Use the blue pull tab (if present on your battery) or your fingers to gently lift the old battery out of its compartment.

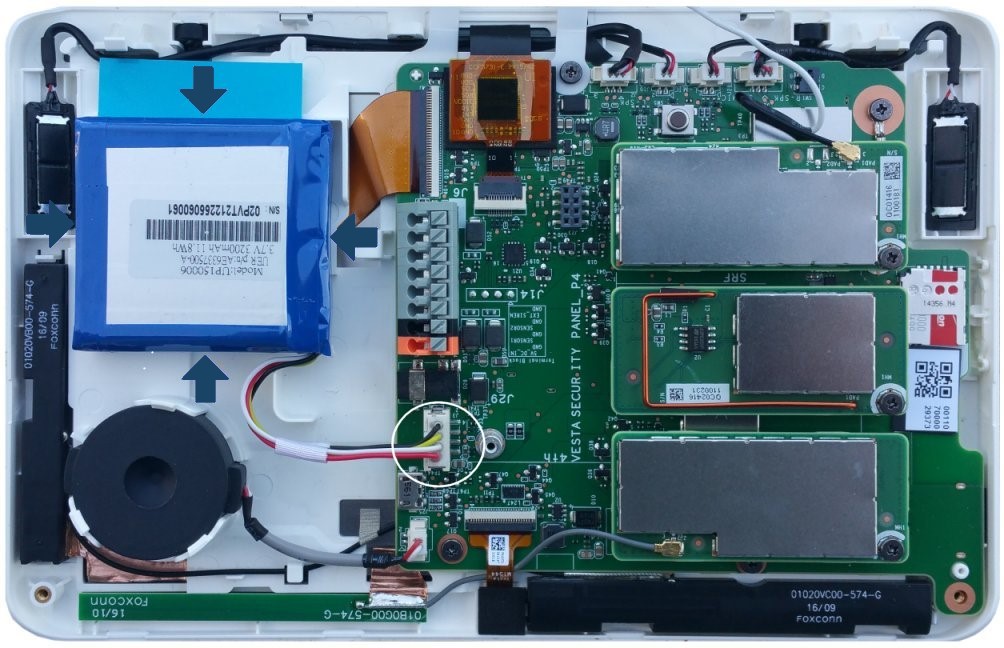
Step 5: Install the New Battery
- Take your new compatible lithium polymer 3200mAh battery.
- If your new battery has an adhesive backing, remove the protective film.
- Carefully place the new battery into the compartment, ensuring it's oriented correctly and sits flat. Press down gently if it has adhesive.
- Securely plug the new battery's connector into the corresponding socket on the circuit board. Ensure it's fully seated.
Step 6: Reassemble and Power Up
- Unhook the hanging strap if used. Carefully swing the front cover of the panel back up.
- Align the panel with the backplate. As per the draft's instructions for closing (Step 4 in original draft): "Align the panel slots with the 4 tabs at the top of the backplate. Press the bottom of the panel against the backplate to snap the two tabs into place, then press the top into place to secure it." Ensure it closes flush and all clips/tabs engage.
- Re-insert and tighten the bottom securing screw.
- Plug the panel's AC power transformer back into the electrical outlet.
- The panel should begin to power up. If not, press and hold the power button (located on the right side edge of the panel) for 3 to 4 seconds until the screen illuminates.
- Allow several minutes for the panel to fully boot up.

Note: The new battery can take up to 24 hours to fully charge. A "Panel Low Battery" warning may be present on the screen until charging is complete. Ensure the AC power is connected to a working outlet.
Clearing Panel Alerts After Replacement
After replacing the battery and powering up, you may need to acknowledge system alerts on your IQ Panel 2.
-
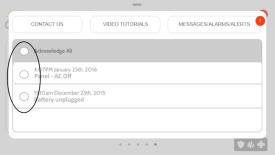
After the panel has fully booted, look for a message icon (often an envelope or speech bubble, sometimes with a number) at the top right of the screen. Tap this icon.
-
Select Messages, then Alerts, and then Alarms from the menu that appears (or navigate directly to the Alerts/Alarms list if presented differently).

-
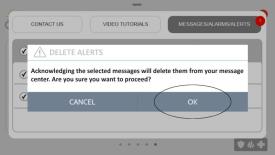
You should see any active alerts listed (e.g., "Panel Tamper" if the cover isn't fully secure, "Panel Battery Low," "AC Power Loss"). Select each trouble alert you wish to acknowledge by tapping the checkbox next to it, or press Acknowledge All if available.
-
Press Ok to confirm the acknowledgment. Then, swipe left or right (or use back/home buttons as appropriate) to exit the message center and return to the main screen.

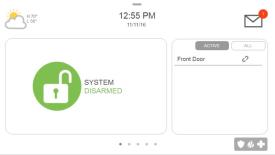
A "Panel Low Battery" alert will persist until the new battery is sufficiently charged (this can take up to 24 hours). Other alerts (like "Panel Tamper" or "AC Power Loss") will only clear if the physical condition causing them is fully resolved.
Troubleshooting Post-Replacement Issues
Addressing common issues that may occur after replacing the IQ Panel 2 battery.
"Low Battery" Alert Persists After 24 Hours
- Verify Full Charge Time: Ensure the panel has been continuously powered by its AC transformer for at least 24 full hours.
- Check Battery Connection: Power down the panel completely (software power down, unplug AC transformer) and carefully re-open it. Double-check that the new battery's connector is securely and correctly plugged into the mainboard.
- Confirm Correct Battery Type: Verify that the replacement battery matches the required specifications (typically a 3.7V 3200mAh Lithium Polymer battery, like Qolsys P/N QR0019-840 or equivalent for the IQ Panel 2).
- Acknowledge Alert Again: After ensuring 24 hours of charging and checking connections, try acknowledging the trouble alert again via the Message Center.
- Potential Faulty Battery or Panel Issue: If the alert still persists, the new battery itself might be faulty, or, less commonly, there could be an issue with the panel's charging circuitry. In this case, please contact us.
Panel Does Not Power On After Battery Replacement
- Verify All Connections:
- Confirm the new battery is correctly and securely plugged into the panel's circuit board.
- Ensure the AC power transformer is firmly plugged into a known working electrical outlet and that its wire is securely connected to the panel's power input terminals or backplate.
- Check Outlet Power: Confirm the electrical outlet is working by testing it with another device (like a lamp). Check for tripped circuit breakers or switched outlets.
- Press and Hold Power Button: After restoring AC power and ensuring the battery is connected, press and hold the panel's side power button for 3-5 seconds to initiate startup.
- Try Old Battery (If It Had Some Charge and Is Safe): If the old battery had some charge and is not damaged, you could (after fully powering down again) temporarily reinstall it to see if the panel powers on. This can help determine if the issue is with the new battery or the panel itself.
- If the panel still shows no signs of life, please contact us.
Panel Beeps Continuously or Shows Other Trouble Alerts (e.g., Tamper)
- Acknowledge Alerts: Go to the Message Center (message icon > Messages > Alerts > Alarms) and acknowledge all listed troubles to silence initial beeping.
- Check for Panel Tamper: Ensure the panel's front cover is properly and securely closed and latched onto the backplate, and the bottom screw is tightened. Any gap or looseness can trigger the tamper switch. Re-inspect internal components to ensure nothing is obstructing full closure.
- Review All Active Alerts: If beeping continues after acknowledging, go back into the Message Center to identify them (e.g., "AC Power Failure" if the transformer is not fully secure).
Further Assistance
How to get more help if you encounter issues during or after the IQ Panel 2 battery replacement.
If you have followed these instructions and are still experiencing problems with your IQ Panel 2's battery, if alerts persist, or if you are uncomfortable performing any of these steps, please do not hesitate to contact us. You can text a Support Representative any time at 469-513-8685. Please be ready to describe the issue and the steps you have already taken.