ADC-VDB770 Video Doorbell Camera Guide
Summary: The ADC-VDB770 is a 1440×1920 HDR video doorbell with built-in analytics, 15′ infrared night vision, two-way audio, and compatibility with mechanical & digital chimes. In this guide, we’ll define key terms, review specifications, walk through factory default procedures, set up Wi-Fi (AP & WPS modes), check signal strength, configure Ethernet, add your doorbell via the Brinks Home™ Desktop Portal and App, suggest optional accessories, troubleshoot common issues, decode LED patterns, and point you to further assistance.
Table of Contents
- Common Terms
- Specifications
- Factory Default
- Wi-Fi Setup
- Signal Strength
- Ethernet Setup
- Add via Brinks Home™ Desktop Portal
- Add via Brinks Home™ App
- Optional Accessories
- Troubleshooting
- LED Reference Guide
- Further Assistance
Common Terms
Learn the key terms used throughout this guide.
- AP Mode
- The doorbell creates its own Wi-Fi SSID (ADC-VDB770 (XX:YY:ZZ)), which you join on your phone or PC to configure your home network via a browser.
- WPS
- Wi-Fi Protected Setup: press the doorbell’s button then your router’s WPS button within 2 minutes to pair automatically—no password required.
- Analytics
- Built-in algorithms that detect people/vehicle motion to reduce false alerts.
- Transformer
- The in-home 16–30 VAC, 10 VA power brick (power supply) that delivers consistent voltage to the doorbell.
Specifications
Review the technical details of the ADC-VDB770.
- Resolution: 1440×1920 pixels @ up to 15 fps
- Field of View: 115° horizontal
- Night Vision: Infrared LEDs up to 15′
- Audio: Two-way omni-directional microphone & speaker
- Power: 16–30 VAC, 10 VA transformer required
- Operating Temp: –22 °F to 104 °F (–30 °C to 40 °C)
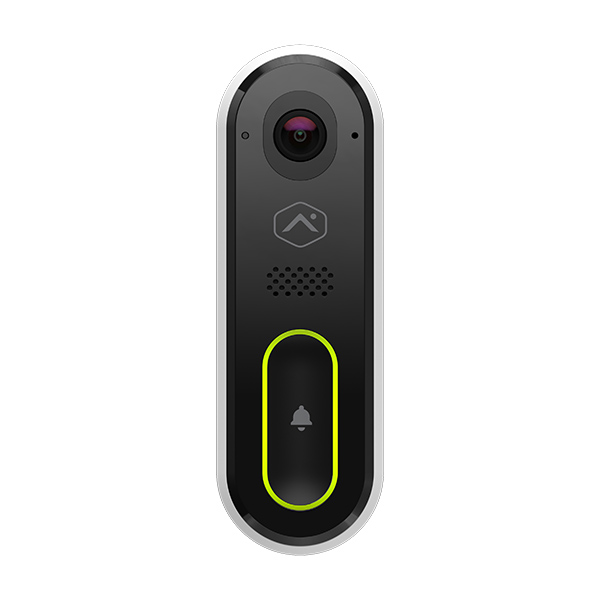
Front view of ADC-VDB770
Factory Default
Warning: Resetting your camera erases all settings. You must contact us after a reset to reconnect it to your account. Call 469-513-8685.
Follow these steps to restore your doorbell to its original factory settings:
- Press and hold the main doorbell button for 75 seconds until the LED alternates red & green.
- Release the button. The doorbell will reboot (LED off → white flash → red/green flashing).
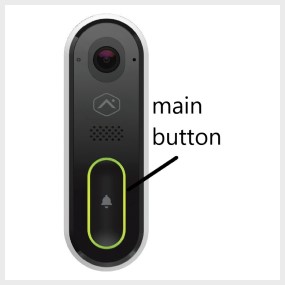
Hold 75 sec until red/green flashing → factory reset
Wi-Fi Setup
Connect your doorbell to Wi-Fi using AP or WPS modes.
AP Mode
Use AP Mode if your router doesn’t support WPS.
- Hold the doorbell button for 45–50 seconds until the LED blinks white.
- On your phone or PC, join the network ADC-VDB770 (XX:YY:ZZ) (no password).
- Open a browser and enter 192.168.1.1 in the search bar, then follow prompts to select your home SSID and enter its password.
- When complete, the LED turns solid green—doorbell is online.
WPS Mode
Note: Use WPS only if your router supports it; otherwise, use AP Mode.
- Open the Brinks Home™ App on your mobile device.
- Tap Video and select Add (+).
- Select ADC-VDB770 or enter its MAC address from the reference card.
- Press the doorbell button, then press your router’s WPS button within 2 minutes.
- Wait for the LED to turn solid green—pairing is successful.
Signal Strength
Check and interpret your Wi-Fi signal level in the Brinks Home™ App.
- Open the Brinks Home™ App.
- Tap the Video icon at the bottom.
- Select your ADC-VDB770 from the list.
- Tap the gear Settings icon (top-right).
- Scroll to Signal Strength (displayed as a percentage).
Interpret your signal level:
Ethernet Setup
Connect via hardwired Ethernet for reliable performance.
- Connect an Ethernet cable from the doorbell’s LAN port to your router or network switch.
- Ensure the doorbell is powered by the 16–30 VAC transformer.
- Wait for the LED to turn solid green—doorbell is online.
Add via Brinks Home™ Desktop Portal
Use the desktop portal to complete installation once your doorbell is on the network.
- Open a browser and go to https://www.alarm.com/login.aspx.
- Log in with your Brinks Home™ account credentials.
- Click Video at the top, then click the gear Settings icon.
- Scroll to Add Video Device and click it.
- Select ADC-VDB770, enter a name (e.g., “Front Door”), and click Install.
- After installation, click Live View to verify your feed.
Add via Brinks Home™ App
Install using the mobile app on your iOS or Android device.
Mobile App: Video Section
- Open the Brinks Home™ App on your mobile device.
- Tap the Video icon at the bottom.
- Tap the Add (+) icon in the top-right corner.
- Select ADC-VDB770 from the list or scan its QR code.
- Follow on-screen prompts to complete setup; ensure the doorbell’s LED turns solid green.
- Tap Live at the top of the Video screen to verify your feed.
Optional Accessories
Enhance functionality with these add-ons:
- Wi-Fi range extender
- Mechanical chime kit
- Digital chime connector
- Faceplate color kits
- Corner mounting bracket
Troubleshooting
Find solutions to common issues with your doorbell.
No Power
- Check transformer output: should read 16–30 VAC with a multimeter.
- Inspect wiring connections at the doorbell and breaker panel.
- Confirm breaker is on and no GFCI has tripped.
No Network Connection
- Verify your Wi-Fi SSID and password (case-sensitive).
- If setup fails, retry in AP Mode or WPS Mode.
- Check Signal Strength for guidance.
Intermittent Connection
- Ensure your router’s 2.4 GHz band is enabled and not overloaded.
- Reduce interference by moving the router or doorbell away from metal objects and appliances.
Poor Video Quality
- Check network bandwidth and signal strength.
- Limit simultaneous network traffic or upgrade your internet plan.
LED Reference Guide
Use this table to interpret LED patterns and take the recommended actions.
Further Assistance
If you need more help, try these resources:
- Call Brinks Home™ Support: 469-513-8685.
- Visit our Support Center: www.brinkshome.com/support.
- Consult the ADC-VDB770 User Manual (PDF).