How to Install the ADC-VDB750 Video Doorbell Camera
Pre-install checklist
- • ADC-VDB750 with included accessories
- • Wired doorbell transformer (recommended 16VAC 10VA) or power supply (minimum 15VDC 8W); specifications are often written directly on the power source
- • Wi-Fi (2.4 or 5 GHz) connection to broadband Internet (Cable, DSL, or Fiber Optic)
- • A computer, tablet, or smartphone with Wi-Fi is required if the router does not have the Wi-Fi Protected Setup (WPS) feature
- • (Optional) Wired compatible mechanical or digital chime
- • (Optional) ADC-VDB750 Power Module (sold separately as ADC-VDBA-PM-750; only required if wired to a digital chime)
- • (Optional) ADC-VDB750 Backplate Adapter (sold separately as ADC-VDBA-750-BPA; can be used if replacing a Slim Line Doorbell Camera and it is preferred to not reconnect the wiring)
- • (Optional) ADC-VDB750 Wedge Mount Kit (sold separately as ADC-VDBA-750-WMK; can be used to optimize the captured field of view)
New Installation Steps
- Turn off power to the doorbell circuit (transformer). The recommended transformer rating is 16VAC 10VA.
- Remove any existing power module from the in-home chime (from previous ADC-VDB770 installations with mechanical or digital chimes or from Slim Line installations with a digital chime).
- Verify that the chime wire terminals are connected to one wire run from the transformer and one wire run from the doorbell.
- • If the in-home chime is digital (rather than mechanical), connect the ADC-VDB750 Power Module (sold separately as ADC-VDBA-PM-750) to the chime by connecting one wire to each of the terminals (leaving the existing wires in place, polarity does not matter).
- • If there is no wired in-home chime, verify that the power source (AC or DC) meets the product requirements, and wire directly (polarity does not matter) to the ADC-VDB750 (no in-line resistor is required).
- Remove the existing doorbell from the wall and disconnect the wires. Secure the wires so that they can be connected in a later step.
- If using an optional wedge, thread the wires at the doorbell through the center of the wedge and mount the wedge to the surface with the provided screws/anchors.
- Thread doorbell wires through wallplate, making sure to thread wires underneath plastic bridges of wallplate leading to screw terminals, and secure to wallplate screw terminals.
- Determine whether to secure the wallplate to the optional wedge or mount it directly to the surface.
- • If using an optional wedge, secure the wallplate to the mounted wedge using the two machine screws provided with the wedge mount kit.
- • If not using an optional wedge, mount the wallplate to the surface with the provided screws/anchors.
- Connect ADC-VDB750 device to wallplate by first securing/latching the top edge, then pushing the device into the wallplate, and lastly securing the bottom set screw with a screwdriver.
- Restore power to the doorbell circuit (transformer).


Steps to Replace a Slim Line Video Doorbell Camera
- Turn off power to the doorbell circuit (transformer). The recommended transformer rating is 16VAC, 10VA.
- If the Slim Line Doorbell camera is wired to a digital chime, remove the existing Skybell Digital Doorbell Adapter. Connect the ADC-VDB750 Power Module (sold separately as ADC-VDBA-PM-750) to the digital chime by connecting one wire to each of the terminals, leaving the existing wires in place. Polarity does not matter.
- • If there is no wired in-home chime, verify that the power source (AC or DC) meets the product requirements, and wire directly (polarity does not matter) to the ADC-VDB750 (no in-line resistor is required).
- Remove existing Slim Line Doorbell Camera from existing wallplate by loosening the bottom set screw.
- Keep the wallplate installed, verifying that the wiring is connected well to the two screw terminals and ensuring that the bottom set screw is loosened sufficiently to not be protruding at all above the threads at the bottom of the wallplate.
- Secure the ADC-VDB750 device to the ADC-VDB750 Backplate Adapter and secure at the bottom of the adapter with the provided set screw.
- Connect the Mounting Adapter (with ADC-VDB750 device attached) to the existing Slim Line wallplate by latching the top edge, then pushing the device into the wallplate, and then securing the original bottom set screw.
- Restore power to the doorbell circuit (transformer).


Connect with AP Mode
- Verify that device boots (flashing red LED) to AP mode (flashing white LED). If the LED is not white after two minutes, hold down the doorbell button and release when the LED begins to blink white (about 35 seconds).
- On an Internet-enabled device, connect to the Wi-Fi network ADC-VDB750 (XX:XX:XX) where XX:XX:XX is the last six characters of the ADC-VDB750’s MAC address, which is located on the device or on the packaging.
- On the same device, open a web browser and enter 192.168.1.1 in the URL field. Follow the on-screen instructions to add the ADC-VDB750 to the Wi-Fi network. The LED may briefly turn red before blinking green. The LED will be solid green when the connection is complete.
- Log in to the Brinks Home App here to add your camera.
- Select the device from the video device list or enter its MAC address to begin adding. The MAC address is located on the device or on the packaging.
- Follow the on-screen instructions to finish adding the device.
Connect with WPS Mode
- Verify that device boots (flashing red LED) to AP mode (flashing white LED). Hold down the doorbell button and release when the LED begins to blink blue (about 30 seconds).
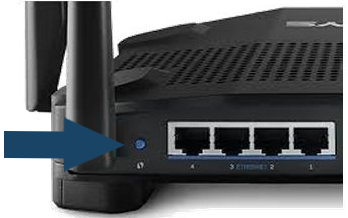
- Activate WPS mode on the router. The device will begin to connect to the Wi-Fi network. The LED will be solid green when the connection is complete.
- Log in to the Brinks Home App here to add your camera.
- Select the device from the video device list or enter its MAC address to begin adding. The MAC address is located on the device or on the packaging.
- Follow the on-screen instructions to finish adding the device.
Connect the ADC-VDB750 to the Network
- Log in to the Brinks Home App. You will need the username and password of the account to log in.
- Tap Add Device. If you do not see the Add Device option, please ensure the camera is first connected to Wi-Fi.
- Tap Doorbell Camera.
- Tap ADC-VDB750.
- Follow the on-screen instructions.
Troubleshooting
If there are issues connecting the video doorbell to the account, power cycle the camera with the following steps:
- Press and hold the doorbell button for 40-45 seconds until the LED starts flashing yellow then release.
- Wait for the device to reboot. After the device reboots, try connecting again.
- If the issues persist, factory reset the video doorbell by pressing and holding the doorbell button until the LED starts blinking red and green (~50 seconds). The device will reboot with factory default.