2GIG-GB1E-345—Battery Replacement
Summary: This guide provides step-by-step instructions to replace the batteries in your 2GIG-GB1E-345 glassbreak detector. When it's time for a replacement, you'll typically see a low battery alert on your main security system panel and may receive a notification in the Brinks Home™ Mobile App. Following these steps will help you maintain your system's protection.
Table of Contents
Quick links for your glassbreak detector battery replacement.
- Video Instructions
- Common Terms
- Battery Specifications and Purchasing
- Important Safety Precautions
- Step-by-Step Battery Replacement Instructions
- Clearing the "Low Battery" Alert from Your Panel
- Understanding the LED Indicator on the GB1E-345
- Troubleshooting After Battery Replacement
- Further Assistance
Video Instructions
This video demonstrates a general process for changing batteries in a glassbreak sensor.
Common Terms
Understanding these terms will help you with the battery replacement.
- 2GIG-GB1E-345
- The model number of your wireless glassbreak detector.
- Glassbreak Detector
- A security sensor designed to detect the sound frequency or shockwave of breaking glass.
- CR123A Lithium Batteries
- The specific type and size of batteries required for this sensor (typically two are needed).
- System Panel
- Your main security alarm control panel (e.g., 2GIG GC2, GC3, Qolsys IQ Panel) where trouble alerts like "low battery" are displayed.
- Brinks Home™ Mobile App
- The application on your smartphone or tablet used to monitor and control your security system, which may also show sensor low battery notifications.
- Sensor Cover
- The outer casing of the glassbreak detector that needs to be opened to access the batteries.
- Backplate
- The part of the sensor that is mounted to the wall or ceiling, to which the sensor cover attaches.
- Tamper Switch/Error
- A small switch inside the sensor that detects if the cover is properly closed. If the cover is not secure after battery replacement, it may cause a "tamper" alert on your main panel.
- Trouble Alert
- A notification on your system panel indicating an issue with a device, such as a low battery or tamper condition.
- User Code
- Your personal code used to silence alarms or acknowledge alerts on your main security panel.
Battery Specifications and Purchasing
Ensure you have the correct batteries for your 2GIG-GB1E-345 glassbreak detector.
Required Batteries:
- Quantity: 2
- Type: CR123A Lithium batteries (3-Volt)
These batteries can be purchased at most local hardware stores, mass retailers (like Target or Walmart), drugstores, or online. For convenience, you can find them online through retailers like Amazon: Search for CR123A Batteries.
You may also text a Support Representative at 469-513-8685 to inquire about ordering replacements.
Important Safety Precautions
Please read these before you start the battery replacement process.
- System Disarm (Recommended): While changing a sensor battery typically won't trigger a full alarm, it might cause your main panel to beep or show a tamper alert. To minimize this, you can disarm your security system before starting.
- Handle with Care: Be gentle when opening the sensor cover and handling the batteries to avoid damaging the sensor.
- Correct Battery Type and Polarity: Ensure you are using new CR123A lithium batteries. When inserting them, pay close attention to the positive (+) and negative (-) polarity markings inside the battery compartment and on the batteries themselves. Incorrect installation can prevent the sensor from working or even damage it.
- Dispose of Old Batteries Properly: Lithium batteries should be disposed of according to your local regulations. Do not throw them in the regular trash. Many electronics stores or local waste facilities offer battery recycling programs.
- Avoid Short Circuits: Do not allow metal objects to touch both terminals of a battery simultaneously.
Step-by-Step Battery Replacement Instructions
Follow these instructions to replace the batteries in your 2GIG-GB1E-345 glassbreak detector.
-
Identify the Sensor: Locate the specific glassbreak detector that has the low battery alert. Your system panel or the Brinks Home™ Mobile App should indicate which sensor needs attention.
-
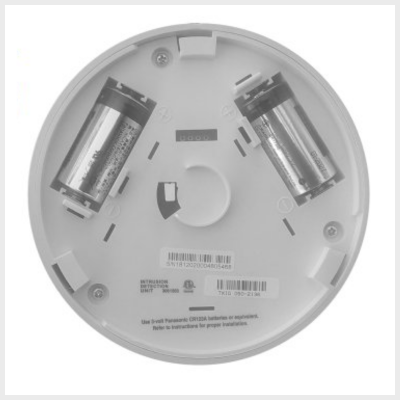
Open the Sensor Cover: The 2GIG-GB1E-345 sensor is typically mounted on a base. To open it, firmly grip the main body of the sensor and twist it counterclockwise (usually about a quarter turn) to detach it from its mounting base (backplate). The cover should then come off.

-
Remove Old Batteries: Once open, you will see the battery compartment. Carefully remove the two old CR123A batteries. Note their orientation before removing.
-
Clean Compartment (If Necessary): Briefly inspect the battery compartment for any signs of corrosion or debris. If present, clean it gently with a dry cotton swab. Ensure the battery contacts are clean and shiny.
-
Insert New Batteries: Insert two new CR123A lithium batteries into the sensor, ensuring you match the positive (+) and negative (-) ends of the batteries with the polarity markings inside the compartment.
-
Replace the Sensor Cover: Align the sensor cover with the backplate according to any alignment marks or notches. Twist the cover clockwise firmly until it locks into place. Ensure it's securely attached.

-
Allow System Update: The sensor will send its updated battery status to the main panel. The low battery alert on your panel should clear automatically. This can sometimes take a few minutes, or up to an hour depending on your system's settings (the draft mentioned up to 60 minutes). If it doesn't clear promptly, proceed to the "Clearing Panel Alerts" section.
Clearing the "Low Battery" Alert from Your Panel
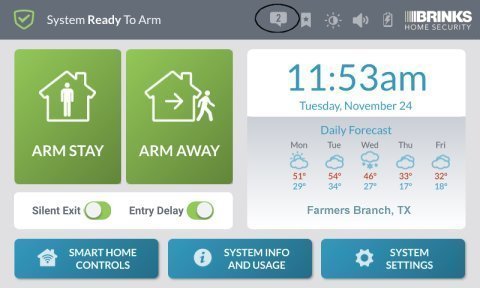
If the "Sensor Low Battery" alert does not clear automatically from your main panel display after a short while, you may need to manually acknowledge or clear it. The exact steps depend on your specific security panel model. Below are instructions for common 2GIG panels.
For 2GIG GC2 Panels:
-
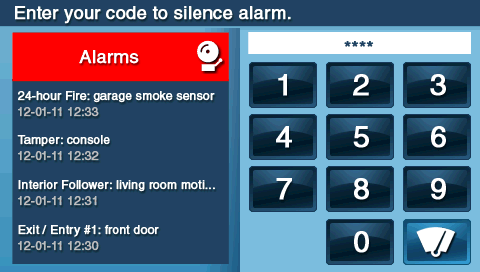
If the panel is beeping or showing an alert, press the Home button, then press the Security button.
-
Enter your 4-digit User Code or Master Code to silence any active alarm sounds or beeping if necessary. The panel may then show a trouble condition (often a yellow triangle or message). Tap the Alarm Icon or trouble message area, often at the bottom right.
-
The panel should display any current alerts or allow access to the alarm history/alerts list. If there's an option to "Clear Alarm History" or acknowledge specific alerts related to the sensor, select it. Press OK or follow prompts to clear the displayed alert and then exit the menu.
For 2GIG GC3 / Edge / Qolsys IQ Panel Series (General Steps):
-
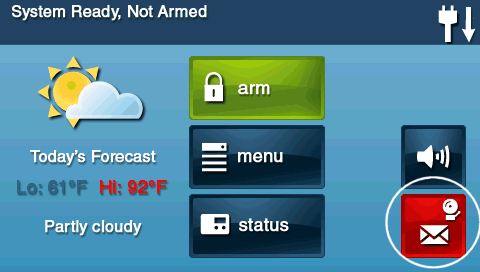
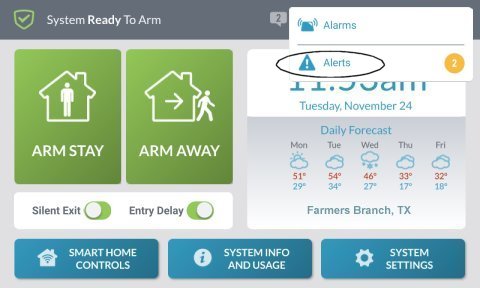
If the panel is beeping or shows a notification, tap the Message Icon (often an envelope or speech bubble) usually located at the top right of the panel screen.
-
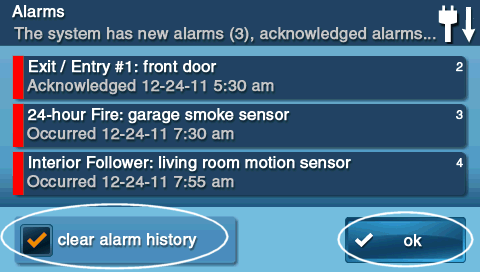
Select Messages, then Alerts, and then Alarms (or navigate directly to the Alerts/Alarms list if presented differently).
-
You should see the "Sensor X Low Battery" alert listed. Select the alert(s) by tapping the checkbox next to them (if applicable for your panel), then tap an Acknowledge or OK button. This confirms you have seen the alert. If the battery condition is now normal, the alert should clear from the active list.
-
Press the back arrow
 or the Home button to exit the menu.
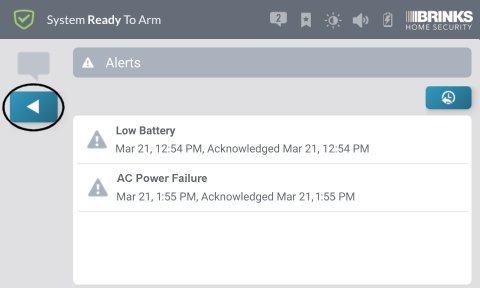

If the low battery alert does not clear after replacing the batteries and attempting to acknowledge, please refer to the Troubleshooting section.
Understanding the LED Indicator on the GB1E-345
The LED on your glassbreak detector provides status information.
The 2GIG-GB1E-345 glassbreak detector has an LED that can help you understand its status:
- Normal State: The LED is typically off to conserve battery life.
- During Test Mode / Activation: When the sensor detects sounds matching breaking glass (or during a specific test using a glassbreak simulator), the LED will usually flash (often red or green depending on the event type it's discriminating - e.g., a thud followed by glass break frequencies).
- After Battery Replacement: When you insert new batteries and close the cover, the sensor will power up. It may flash its LED briefly (e.g., a single red or green flash) to indicate it's operational and has completed its power-on sequence.
If you are unsure about an LED pattern not described here, refer to the sensor's specific installation manual or contact support.
Troubleshooting Post-Replacement Issues
Addressing common issues that may occur after replacing the glassbreak detector batteries.
"Low Battery" Alert Persists on Main Panel
- Allow Time for Update: After installing new batteries, wait at least 60 minutes for the sensor to send several updated status signals to the panel. Some systems may take longer for the alert to clear.
- Ensure Fresh, Correct Batteries: Confirm you used two new CR123A lithium batteries. Old "new" batteries or incorrect types can cause issues.
- Verify Battery Orientation: Carefully re-open the sensor (you may want to disarm your system or anticipate a tamper alert) and double-check that both batteries are inserted with the correct positive (+) and negative (-) polarity.
- Clean Battery Contacts: If the contacts inside the sensor's battery compartment appear dull or corroded, gently clean them with a pencil eraser or a cotton swab lightly moistened with isopropyl alcohol (ensure it's dry before reinserting batteries).
- Acknowledge/Clear Alert at Panel: Follow the specific steps for your panel model in the "Clearing Panel Alerts After Replacement" section again.
- Sensor Test: Perform a sensor test from your main panel (if available for glassbreak detectors) to see if the panel is receiving signals from it.
- Faulty New Batteries or Sensor: If the alert persists after all the above, it's possible the new batteries are faulty, or the sensor itself may have an issue. Try a different set of new batteries. If that doesn't work, the sensor might need replacement.
Sensor Not Working After Battery Replacement (e.g., Fails Sensor Test)
- Re-Check Battery Installation: Confirm correct battery type (2 x CR123A Lithium), proper orientation, and that they are making good contact.
- Ensure Sensor Cover is Securely Closed: The sensor likely has an internal tamper switch. If the cover is not snapped on completely and locked into the base correctly, the sensor will be in a tamper state and will not function normally or report correctly to the panel. You might get a "Sensor Tamper" alert.
- Allow Initialization Time: After inserting batteries and closing the cover, give the sensor a minute or two to initialize before testing.
- Physical Damage: Inspect the sensor for any visible signs of damage that might have occurred during the battery replacement.
Cover is Hard to Open or Close
- Correct Twisting Action: Ensure you are twisting in the correct direction (counterclockwise to open, clockwise to close) and that you are applying firm but even pressure. Refer to the alignment marks if present.
- Alignment: When closing, make sure any alignment marks or notches on the cover and the base are correctly lined up before twisting to lock.
- Obstructions: Check for any debris or pinched wires (though unlikely in this sensor type) that might be preventing smooth operation.
Further Assistance
How to get more help if you encounter issues with your glassbreak detector.
If you have followed these instructions and are still experiencing problems with your 2GIG-GB1E-345 glassbreak detector after replacing the batteries, or if you are uncomfortable performing any of these steps, please do not hesitate to contact us. You can text a Support Representative any time at 469-513-8685. Please be ready to describe the issue and the steps you've already taken.