Honeywell 5816—Battery Replacement
Summary: This guide provides step-by-step instructions to replace the CR123A 3-volt lithium battery in your Honeywell 5816 door/window sensor. When it's time for a replacement, you’ll typically receive a low battery alert on your main security system panel and possibly a notification in the Brinks Home™ Mobile App. Following these steps carefully will ensure your sensor continues to function properly and helps maintain your home's security.
Table of Contents
Quick links for your Honeywell 5816 sensor battery replacement.
- Common Terms
- Battery Specifications and Purchasing
- Important Safety Precautions
- Step-by-Step Battery Replacement Instructions
- After Replacing the Battery & Clearing Alerts
- Troubleshooting and Tips
- Further Assistance
Common Terms
Understanding these terms will help you with the battery replacement.
- Honeywell 5816
- The model number of your wireless door and window sensor.
- Sensor
- The larger part of the two-piece door/window contact that contains the battery and transmitter.
- Magnet
- The smaller part of the two-piece door/window contact that is mounted on the door or window itself, aligned with the sensor.
- CR123A Lithium Battery
- The specific type and size of battery required for this sensor (one is needed).
- System Panel
- Your main security alarm control panel (e.g., 2GIG GC2, Qolsys IQ Panel) where trouble alerts like "low battery" for the sensor are displayed.
- Brinks Home™ Mobile App
- The application on your smartphone or tablet used to monitor and control your security system, which may also show sensor low battery notifications.
- Sensor Cover
- The outer casing of the Honeywell 5816 sensor that needs to be opened to access the battery.
- End Latch
- The mechanism, typically a small tab or button, on one end of the sensor that you press to release and remove the cover.
- Polarity
- The positive (+) and negative (-) ends of the battery. It's crucial to install the new battery with the correct polarity alignment as indicated in the sensor's battery compartment.
- Tamper Alert
- A notification from your system panel indicating that a sensor's cover is open or not properly secured. Ensuring the cover is snapped back on correctly after battery replacement is important to avoid this.
- Low Battery Alert
- A notification on your system panel indicating that the battery in a specific sensor (like the 5816) is weak and needs replacement.
Battery Specifications and Purchasing
Ensure you have the correct battery for your Honeywell 5816 door/window sensor.
Required Battery:
- Quantity: 1 (one)
- Type: CR123A 3-volt lithium battery
These batteries are widely available and can be purchased at most local hardware stores, supermarkets, drugstores, mass retailers (like Target or Walmart), or online. For example, you can find them online here.
You may also text a Support Representative at 469-513-8685 to inquire about ordering replacements or for recommendations.
Important Safety Precautions
Please read these before you start the battery replacement process.
- System Disarm (Recommended): While changing a sensor battery usually won't trigger a full alarm, it might cause your main security panel to beep or display a sensor tamper/trouble alert temporarily. To minimize these notifications during the process, it's a good practice to disarm your security system before starting.
- Handle with Care: Be gentle when opening the sensor cover using the end latch. Avoid forcing components, which could damage the sensor casing or internal parts.
- Correct Battery Type and Polarity: Ensure you are using a new CR123A 3-volt lithium battery. When inserting the new battery, pay close attention to the positive (+) and negative (-) polarity markings inside the battery compartment and on the battery itself. Incorrect installation can prevent the sensor from working or potentially damage it.
- Dispose of Old Batteries Properly: Lithium batteries should be disposed of according to your local regulations. Do not throw them in regular household trash. Many electronics stores or local waste management facilities offer battery recycling programs.
- Avoid Short Circuits: Do not allow metal objects (like tools or other batteries) to touch both terminals of a battery simultaneously, as this can cause a short circuit.
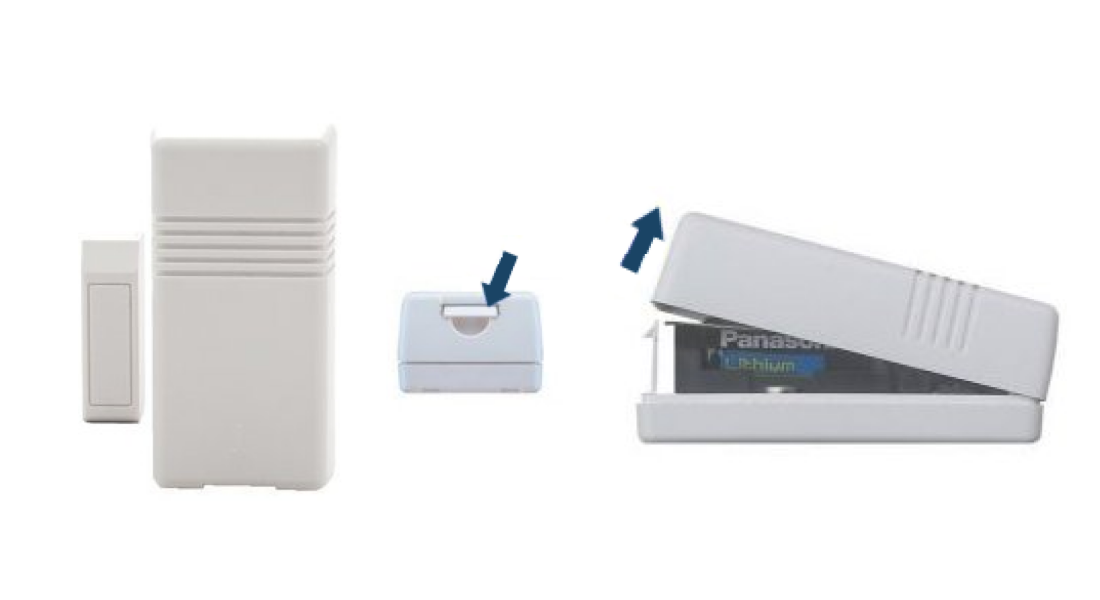
Step-by-Step Battery Replacement Instructions
Follow these instructions to replace the battery in your Honeywell 5816 door/window sensor.
-
Locate the Sensor: Identify the specific Honeywell 5816 door/window sensor that is reporting a low battery. Your main system panel or the Brinks Home™ Mobile App should indicate the zone name or number.
-
Open the Sensor Cover: The Honeywell 5816 sensor typically has a latch on one of its shorter ends. Press this end latch firmly with your thumb or finger. While pressing the latch, gently pull or slide the sensor cover away from the sensor base.
-
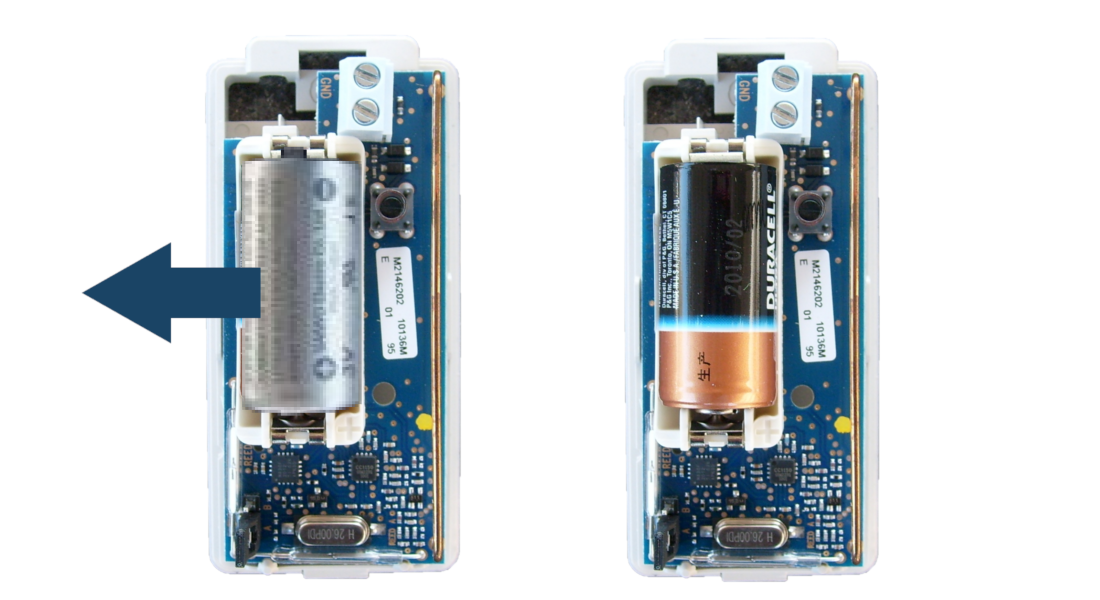
Remove the Old Battery: Once the cover is removed, you will see the CR123A battery. Carefully take out the old battery from its compartment. Note its orientation (+/-) before removing it.
-
Inspect Battery Compartment: Briefly check the battery compartment for any signs of corrosion or debris on the contacts. If present, gently clean the contacts with a dry cotton swab or a pencil eraser.
-
Insert the New Battery: Take your new CR123A 3-volt lithium battery. Insert it into the compartment, ensuring you match the positive (+) and negative (-) ends of the battery with the polarity markings indicated inside the sensor. The positive end usually has a small raised nub.
-
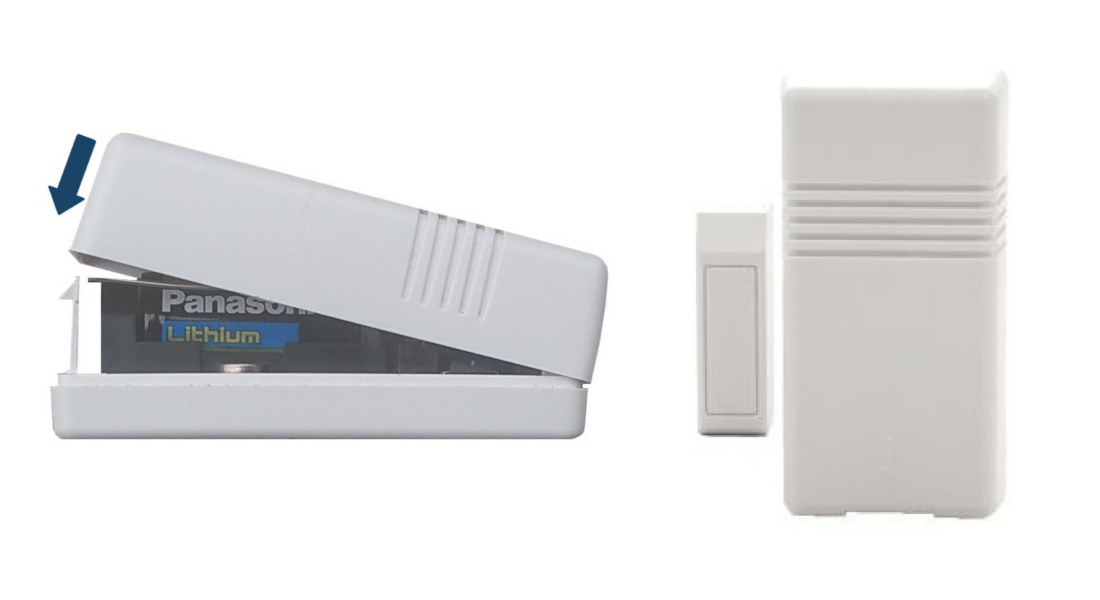
Reattach the Sensor Cover: Align the sensor cover with the base. Typically, you'll align the side opposite the latch first, then pivot or press the cover down until the latch on the other end snaps securely into place. You should hear or feel it click.
After Replacing the Battery & Clearing Alerts
What to do once the new battery is installed in your sensor.
-
Allow System to Update: After replacing the battery and closing the sensor cover, your security system panel needs to receive an updated status signal from the sensor. This can sometimes take a few minutes, or in some cases, up to an hour or a few arm/disarm cycles for the panel to fully recognize the new battery state and clear the low battery alert automatically.
-
Verify Alert Clearance: Check your main security panel. If the "Sensor Low Battery" alert for the Honeywell 5816 has not cleared on its own after a reasonable amount of time (e.g., 60 minutes), you may need to manually acknowledge or clear the alert from your panel.
-
Clearing Alert from Panel: The exact steps to clear an alert vary by panel model.
- For some panels, like the 2GIG GC2, instructions to manually clear alerts can be found by following specific panel procedures (your original instructions included a link: Clear Alert on GC2 Panel).
- For other panel models, consult your panel's user manual for instructions on clearing trouble alerts. This often involves entering your user code (sometimes twice) or navigating to a "Status," "Alerts," or "Messages" menu to view and acknowledge the specific low battery trouble.
-
Test the Sensor: Once the low battery alert is cleared (or even if it hasn't cleared yet but you want to confirm functionality), test the sensor by opening and closing the protected door or window. Your panel should indicate the sensor's status change (e.g., by chiming if the chime feature is on and the system is disarmed, or by showing the zone as open/closed on the display).
Troubleshooting and Tips
Solutions for common issues and helpful advice for your Honeywell 5816 sensor.
"Low Battery" Alert Doesn't Clear from Panel
- Allow More Time: Give the system up to a few hours, or perform a couple of arm/disarm cycles, as some panels only update sensor battery status periodically.
- Fresh Batteries: Ensure the CR123A battery you installed is new and from a reputable brand. Even new batteries can occasionally be duds.
- Correct Polarity: Double-check that the battery was inserted with the positive (+) and negative (-) terminals correctly aligned with the markings in the sensor's battery compartment.
- Clean Contacts: If you haven't already, try gently cleaning the battery contacts inside the sensor with a dry cotton swab or pencil eraser to remove any potential film or corrosion.
- Manual Alert Clearing: Make sure you have followed the correct procedure for your specific security panel to manually acknowledge and clear old alerts.
- Re-seat Battery: Try removing the battery, waiting 30 seconds, and then reinserting it carefully.
- If the alert still persists after 24 hours and trying these steps, the sensor itself might have an issue, or there could be a problem with how the panel is receiving its status.
Sensor Not Working After Battery Replacement (Fails to Detect Open/Close)
- Verify Battery Installation: Confirm the battery is the correct CR123A type, inserted with the correct polarity, and making good contact.
- Secure Sensor Cover: Ensure the sensor cover is snapped on completely and securely. If the cover is loose, an internal tamper switch might prevent the sensor from operating or reporting correctly. This could result in a "Sensor Tamper" alert.
- Allow Initialization: After inserting the battery and closing the cover, give the sensor a minute or two to initialize before testing it by opening and closing the door/window.
- Sensor/Magnet Alignment: Check the alignment between the sensor (larger part) and its corresponding magnet (smaller part). They should be close to each other (typically within 1/2 inch or as specified in the sensor manual) when the door/window is closed, and properly aligned according to any markings.
- Physical Damage: Inspect the sensor for any visible signs of damage that might have occurred during the battery replacement process.
Tips for Optimal Performance
- Dispose of Old Battery Responsibly: Lithium batteries should be recycled according to local environmental regulations. Many electronics stores or municipal waste programs accept them.
- Keep Spare Batteries: It's a good idea to keep a spare CR123A battery on hand for future replacements, especially if you have multiple sensors using this type.
- Regular System Tests: Periodically test all your security sensors, including the Honeywell 5816, to ensure they are functioning correctly. Your main panel usually has a system test mode for this purpose.
Further Assistance
How to get more help if you encounter issues with your Honeywell 5816 sensor.
If you require additional assistance with replacing the battery, if the low battery alert does not clear, or if the sensor is not functioning correctly after following these steps, you can text a Support Representative any time at 469-513-8685. Please be ready to describe the issue and the steps you have already performed.