ADC-V721W/ADC-V722W Outdoor Camera Guide
Summary: The ADC-V721W and ADC-V722W outdoor bullet cameras offer 1280×800 resolution, 40′ infrared night vision, and a 62°×38° field of view. Although discontinued, they remain supported on Alarm.com. This comprehensive guide covers specifications, common terms, factory reset, Wi-Fi setup (WPS & AP modes), Alarm.com integration (desktop & mobile), detailed troubleshooting, and an expanded LED status reference.
Table of Contents
- Specifications
- Common Terms
- Factory Default
- Wi-Fi Setup via WPS Enrollment
- Wi-Fi Setup via Access Point
- Add Camera via Desktop App
- Add Camera via Mobile App
- Troubleshooting
- LED Status Reference
Specifications
- Video: 1280×800 pixels @ up to 30 fps
- Night Vision: Infrared LEDs up to 40 ft
- Field of View: 62° H × 38° V
- Wireless: Wi-Fi 802.11 b/g/n (2.4 GHz)
- Power: 12 V DC adapter (sold separately)
- Operating Temp: –4 °F to 122 °F (–20 °C to 50 °C)
- Housing: IP66 weather-proof

ADC-V721W / V722W Outdoor Bullet Camera Overview
Common Terms
- AP Mode
- The camera broadcasts a temporary Wi-Fi SSID (ALARM (xx:xx:xx)). Use your phone or PC to join that network and configure your home Wi-Fi credentials via its web interface at 192.168.1.1.
- WPS
- Wi-Fi Protected Setup: press the camera’s WPS button, then press your router’s WPS button within 2 minutes to pair automatically without entering a password.
- PIR Sensor
- Passive Infrared detector inside the camera that senses heat/motion. Triggers recording or alerts when it detects a temperature change in its coverage zone.
- Firmware
- Embedded software running on the camera. Updates may add features, improve image quality, and patch security vulnerabilities. Check Alarm.com for update notifications.
Factory Default
Important: Factory resetting erases all configuration (network, name, recording rules). After resetting, you must re-add the camera in Alarm.com and redo network setup.
- Press and hold the rear button for 15 seconds until the LED alternates red/green.
- Release the button; wait for the camera to reboot (LED goes off, then white flash, then red/green).

Hold 15 sec → LED red/green → factory reset in progress
Wi-Fi Setup via WPS Enrollment
- Hold the rear button for 5 seconds until the LED flashes blue—this enters WPS mode.
- Within 2 minutes, press the WPS button on your router (or enable WPS in its settings).
- Wait up to 2 minutes for LED to change:
- Solid green: Paired and online—open Alarm.com to view live feed.
- Solid red: Pairing failed—check SSID/WPS compatibility or use AP mode.


Wi-Fi Setup via Access Point
- Hold the rear button for 6 seconds until the LED flashes white—camera starts its own SSID.
- On your smartphone or PC, open Wi-Fi settings and join SSID ALARM (xx:xx:xx) (no password).
- Open a web browser to 192.168.1.1. In the camera’s menu:
- Tap SCAN FOR WI-FI NETWORKS.
- Select your home SSID, enter Wi-Fi password, tap SAVE, then OK.
- LED goes solid green when the camera successfully rejoins your network.

Flashing white = AP mode ready
Add Camera via Brinks Home™ Desktop App
Prerequisite: Camera must already be on your Wi-Fi network.
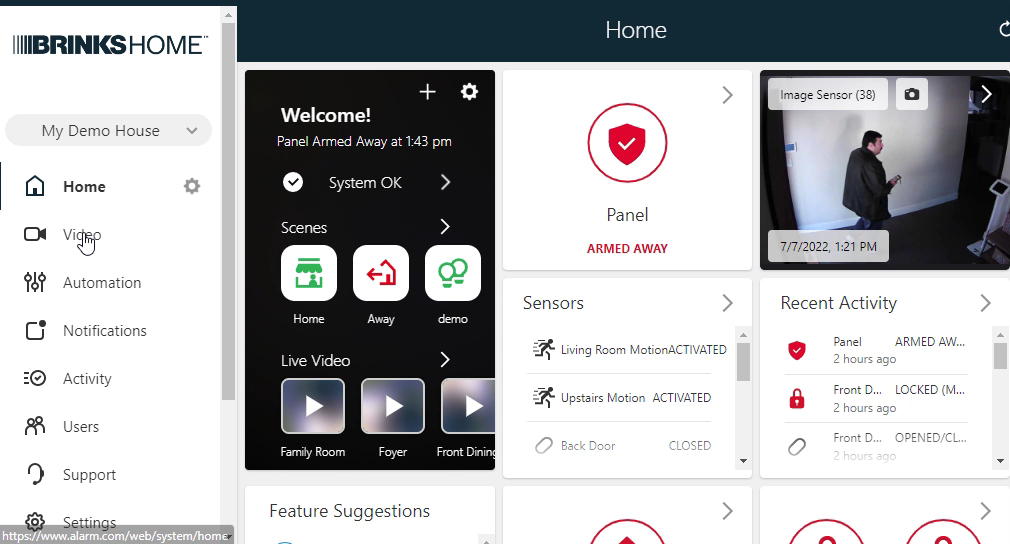
- Log in to Alarm.com and click Video.
- Click gear Settings (top right of Video page).
- Scroll to Add video device and click it.
- Select your camera, enter a descriptive name, then click Install.
- Configuration may take several minutes—when complete, click Live View to confirm.
Add Camera via Brinks Home™ Mobile App
Prerequisite: Camera must already be on your Wi-Fi network.
- Open Brinks Home™ app and tap Video (camera icon at bottom).
- Tap gear Settings (top right).
- Select Add video device.
- Pick your camera, name it, then tap Next.
- Wait for setup (several minutes), then tap Live to verify feed.
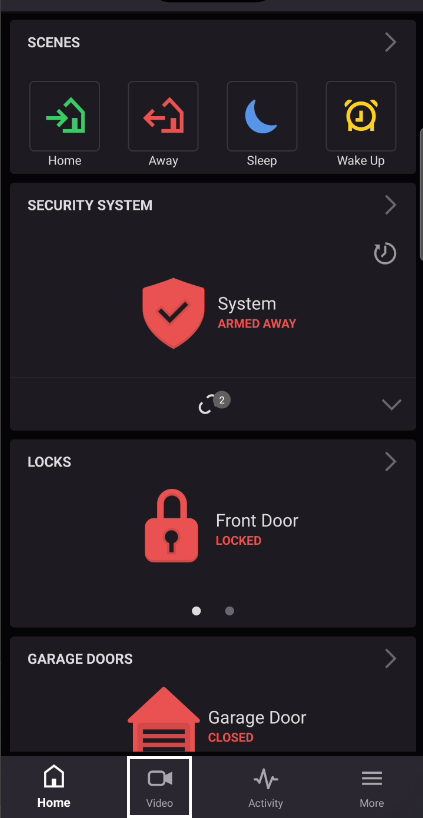
Mobile App: Add Device
Troubleshooting
- No Image:
- Verify your 12 V DC adapter with a multimeter at the camera’s power jack (should read ~12 V).
- Ensure the power cable is fully inserted and not damaged.
- Poor Night Vision:
- Clean lens and IR window with a soft, lint-free cloth.
- Ensure no bright lights or reflective surfaces in front of the camera.
- No Live View:
- Confirm router firewall allows outbound TCP/UDP to Alarm.com servers.
- Disable “guest network isolation” if enabled on your Wi-Fi network.
- Intermittent Connection:
- Check Wi-Fi strength (≥ 70 %) using a phone-based Wi-Fi analyzer app near the camera location.
- Relocate router or add a Wi-Fi extender for better coverage.
LED Status Reference
| LED Pattern | Meaning | Recommended Action |
|---|---|---|
| Off | No power | Use a multimeter to confirm 12 V at jack; replace adapter if no voltage. |
| Solid Green | Connected to network | Open Brinks Home app/web and view Live View to confirm. |
| Solid Red | Network unreachable | Verify SSID/password, retry WPS or AP setup; reboot router if needed. |
| Flashing Red | Factory reset or firmware update | Wait 1–2 minutes; ensure continuous power until LED changes. |
| Red & Green Alternating | AP mode ready | Connect to ALARM SSID and configure via 192.168.1.1. |
| Flashing Blue | WPS pairing in progress | Wait up to 2 minutes; if still flashing, retry WPS or switch to AP mode. |