2GIG GC2 GoControl - Sensor Test
Summary: Performing a system test on your 2GIG GoControl panel is a vital step to ensure all your security sensors and panel functions are operating correctly. This guide provides step-by-step instructions to walk you through the complete test procedure.
Table of Contents
Quick links to help you test your 2GIG GoControl security system.
- Common Terms
- How to Perform a System Test: Step-by-Step
- Understanding Test Results
- Important Notes on System Testing
- Troubleshooting System Test Issues
- Further Assistance
Common Terms
Familiarize yourself with these terms before starting the system test.
- 2GIG GoControl Panel
- Your security system's main control unit (often GC2 or GC2e model) with a touchscreen interface.
- System Test
- A diagnostic mode on your panel that allows you to verify the functionality of connected sensors (zones), panel buttons, and the audible sounder/siren.
- Sensor (Zone)
- Devices like door/window contacts, motion detectors, or glass break sensors that report activity to your panel. Each is a "zone."
- Master Code
- Your primary 4-digit user code required to access system functions like the Toolbox and initiate a system test.
- Toolbox
- A menu on the 2GIG panel that provides access to various user and system functions, including the System Test feature.
- Signal Strength (Sensor)
- During the system test, this refers to the wireless signal quality between an individual sensor and the main panel, indicating how well they are communicating.
- Home Button
- The main physical button on the front of the panel, often tested for its LED color functionality during the system test.
- Emergency Buttons
- Dedicated options (usually virtual icons displayed during a specific test phase) for Police, Fire, and Medical panic functions. Testing these buttons during this local system test confirms they are recognized by the panel; it does not send an alarm signal externally *during this specific test mode on the panel*.
- Sounder (Siren)
- The audible device built into your panel that sounds during alarms. Its function is also checked during the system test.
How to Perform a System Test: Step-by-Step
Follow these instructions to test your 2GIG GoControl panel and sensors.
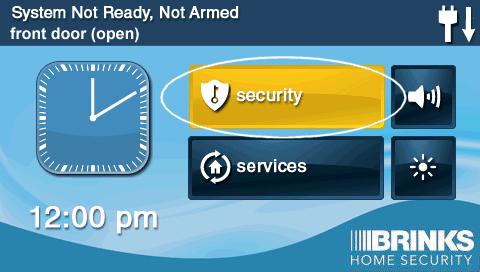
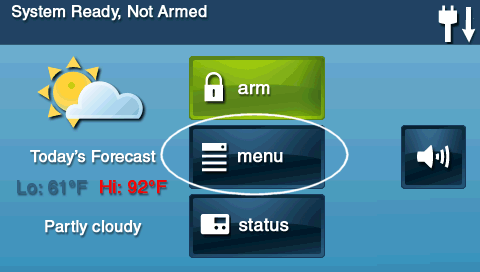
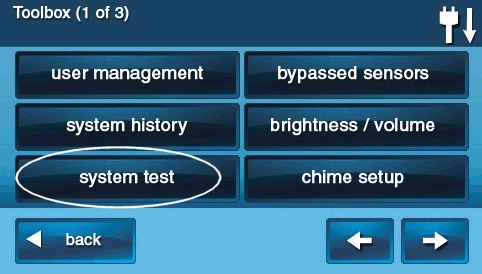
1. Access the Security Menu
From the panel's Home screen, press the SECURITY button, then press the MENU button.
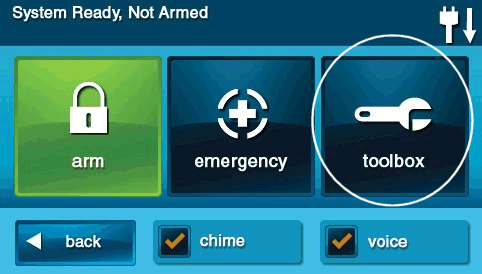
2. Enter the Toolbox
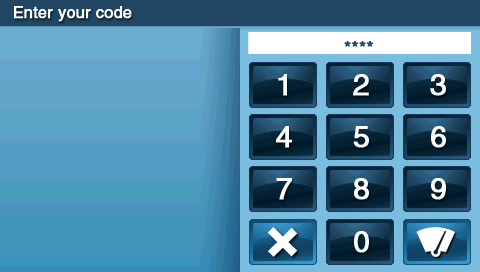
Press the TOOLBOX button. The panel will prompt you to enter your 4-digit code. Enter your Master Code.
3. Start System Test
In the Toolbox menu, press the SYSTEM TEST button. The GoControl panel will announce it is entering test mode and display the sensor test screen.
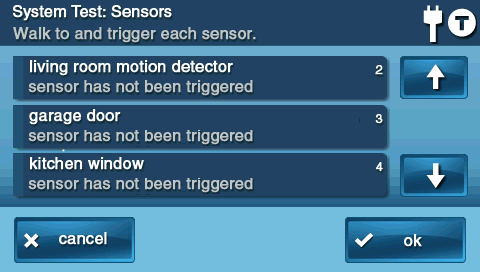
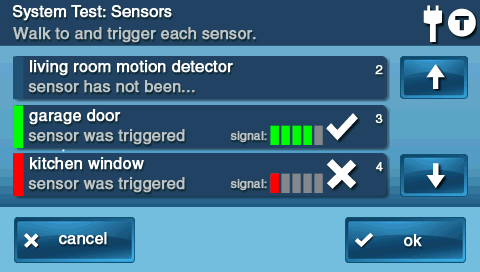
4. Test Sensors (Zones)
Individually trigger each of your programmed sensors:
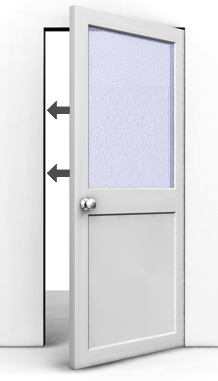
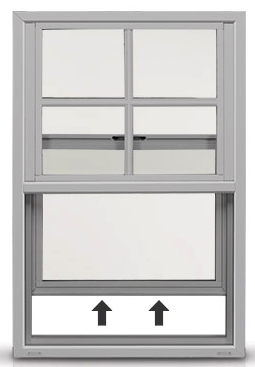
- Door/Window Sensors: Open and then close the protected door or window.
- Motion Detectors: Walk in front of the motion detector to create movement within its detection area. (You may need to wait a minute or two for the motion detector to reset after initially entering the room before it will detect new motion for the test).
- Other Sensors: Test any other types of sensors (glass break, smoke/CO detectors if included in this test type – though smoke/CO often have their own specific test buttons) according to their recommended test procedures.
5. Confirm Sensor Functionality
As each sensor is triggered, the panel should beep and verbally announce the sensor's name or zone number. The screen will typically display the sensor that was activated and may show its signal strength (often 1 to 5 bars). If all tested sensors transmit successfully, press OK on the panel screen to proceed to the next part of the test.
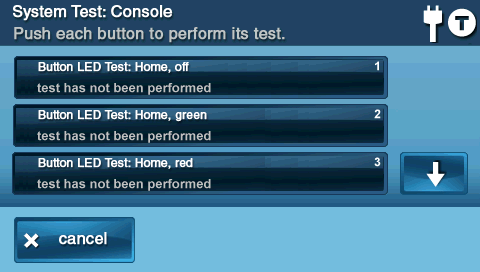
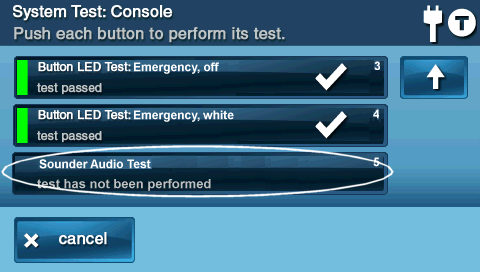
6. Test Home Button Colors (Console Test)
The panel may then proceed to a console test. It might ask you to test the Home button's LED colors. Press each button or follow the on-screen prompts to test the different LED colors (e.g., green, red, amber). Confirm if you see the indicated color by pressing No or Yes as prompted for each test.
7. Test Emergency Buttons (Console Test)
Next, the panel will likely prompt you to test the emergency buttons (Police, Fire, Emergency/Medical). Press each emergency button icon as it is highlighted or listed on the screen. The panel will ask you to confirm if the button registered. Press No or Yes accordingly. Note: During this specific local panel test mode, pressing these buttons does NOT send an alarm signal to emergency services.
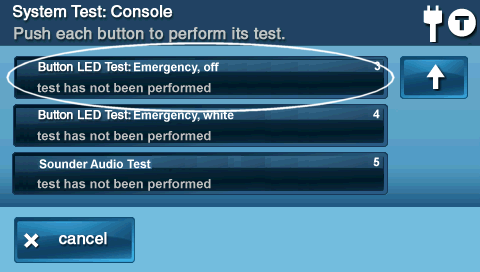
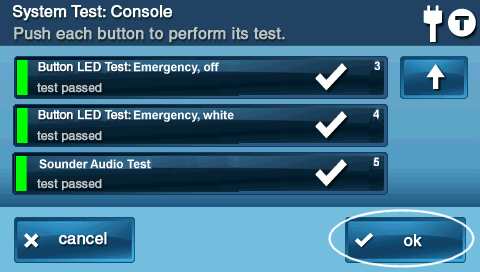
8. Perform Sounder Audio Test (Console Test)
The panel will then test its internal sounder (siren). Press the button for the Sounder Audio Test (or it may activate automatically). The panel should emit a loud sound. Confirm if you heard the internal speaker/siren sound by pressing Yes or No.
9. Complete the System Test
If all tests are successful and you have confirmed each step, the panel will indicate the system test is complete. Press OK or follow prompts to finish. Then, press the BACK button (arrow icon) or the Home button repeatedly to exit the menus and return to the Home screen.
Understanding Test Results
Interpreting the outcomes of your system test.
- Successful Sensor Test: When you trigger a sensor, the panel should beep, announce the sensor's name/zone, and display its signal strength. This confirms the sensor is powered, communicating with the panel, and its basic function (opening, detecting motion) is working.
- Failed Sensor Test: If a sensor does not cause any response on the panel when triggered (no beep, no announcement, no signal strength displayed), it has failed the test. This could indicate a dead battery in the sensor (most common for wireless sensors), the sensor being out of range, physical damage, or incorrect programming.
- Button/Sounder Test: For the Home button colors, emergency button registrations, and sounder test, a "pass" means the panel correctly registered your input or produced the expected output (light or sound). A "fail" means that specific panel function did not work as expected.
- Signal Strength Indication: The signal strength displayed for sensors (often 1-5 bars) indicates the quality of the wireless link between that sensor and the panel. Consistently low signal strength (e.g., 1-2 bars) might lead to unreliable sensor performance in the future, even if it passes the test.
Important Notes on System Testing
Keep these key points in mind for effective system testing.
- Regular Testing is Key: Perform a full system test regularly, for example, on a monthly basis, to ensure ongoing reliability of your security system. Also, test after any changes to your home (like renovations), after replacing sensor batteries, or if you suspect a component might not be working correctly.
- Address Failed Tests Promptly: If any part of your system test fails (e.g., a sensor doesn't respond, the sounder doesn't work), note the specific sensor or component that failed. Refer to the Troubleshooting System Test Issues section below or contact support for assistance. A failed component means that part of your system may not be providing protection.
- Battery Life: System tests, especially those involving multiple sensor activations and siren tests, can consume more battery power from wireless sensors than normal operation. If sensors have old batteries, a test might highlight this.
Troubleshooting System Test Issues
What to do if you encounter problems during the system test.
Panel Doesn't Enter System Test Mode
- Incorrect Master Code: Ensure you are entering the correct 4-digit Master Code when prompted to access the Toolbox. Other user codes may not have permission.
- Incorrect Menu Navigation: Double-check that you are following the correct path: Security > Menu > Toolbox > (Master Code) > System Test.
- Panel in Alarm/Conflicting State: If the system is currently in an alarm state or has a critical trouble that prevents user functions, you may not be able to enter test mode. Address any active alarms or critical troubles first.
Sensor Fails Test (No Panel Response, No Beep, No Signal Strength)
- Sensor Battery: For wireless sensors, the most common cause of failure is a dead or very low battery. Replace the battery in the specific sensor and try testing it again.
- Sensor Range/Interference: The sensor might be too far from the panel, or there could be new sources of wireless interference (metal objects, new appliances) blocking its signal. Try to minimize interference or consider if anything has changed in the sensor's environment.
- Sensor Tamper: Ensure the cover of the sensor is securely closed. An open sensor cover (tamper condition) can prevent it from functioning correctly.
- Sensor Damage or Fault: The sensor itself might be physically damaged or have an internal fault.
- Sensor Programming: Although less likely if it was working before, the sensor's programming in the panel could be corrupted or deleted. This would typically require installer-level access to fix.
Home Button or Emergency Button Test Fails
- Touchscreen Issue: If the panel doesn't register your press on a virtual emergency button, there might be an issue with that specific area of the touchscreen. Try cleaning the screen gently.
- Panel Software Glitch: A temporary software glitch could cause unresponsiveness. If multiple button tests fail, you might consider rebooting the panel (after exiting test mode). However, panel reboots should be done cautiously; consult support if unsure.
Sounder Audio Test Fails (No Sound or Very Faint Sound)
- Sounder Volume Setting: While test mode usually uses a default volume, check if the panel's general sounder/siren volume has been inadvertently set very low or off in other settings (though this is less likely to affect a dedicated test).
- Panel Speaker/Sounder Fault: There might be a hardware issue with the panel's internal speaker or sounder component. This would likely require professional service.
Panel Reports Communication Failure During or After Test
- This indicates a problem with the panel's primary communication path (Cellular or Wi-Fi) to an external service, which is separate from the local sensor/component tests.
- This communication issue needs to be troubleshooted separately (e.g., checking Wi-Fi connection, cellular signal, router issues). This system test guide focuses on local sensor and panel functionality.
Further Assistance
How to get more help if your system test fails or if you have other questions.
If any components fail the system test and the troubleshooting steps above do not resolve the issue, or if you are uncomfortable performing any part of the test, please contact support. Regular, successful system tests are crucial for ensuring your security. You can text a Support Representative anytime at 469-513-8685. Please be ready to describe which part of the test failed and any error messages you observed.