GC2 Panel—Battery Replacement
Summary: This guide provides step-by-step instructions to safely replace the backup battery in your 2GIG GC2 or GC2e security panel. This process ensures your panel remains operational during power outages. Note that a low battery alert might persist for up to 24 hours after replacement while the new battery fully charges.
Table of Contents
Quick links to guide you through replacing your GC2/GC2e panel's battery.
- Common Terms
- Battery Specifications and Purchasing
- Important Safety Precautions
- Video Guide
- Battery Replacement Instructions
- Clearing Panel Alerts After Replacement
- Troubleshooting Post-Replacement
- Further Assistance
Common Terms
Understanding these terms will help you during the battery replacement process.
- GC2/GC2e Panel
- Your 2GIG Go!Control security panel (models GC2 or GC2e).
- Backup Battery (2GIG-BATT2X)
- The internal rechargeable battery pack (model 2GIG-BATT2X or compatible) that powers your panel if AC power is lost.
- Front Panel / Panel Assembly
- The main casing of the GC2/GC2e panel which houses the screen and electronics. This needs to be opened or detached from the backplate to access the battery.
- Backplate
- The mounting plate fixed to the wall, to which the panel is attached.
- Transformer (Power Supply)
- The external device that plugs into an electrical outlet and provides AC power to your panel.
- AC Power
- The standard electrical power from your wall outlets, supplied to the panel via its transformer.
- Trouble Alert / System Trouble
- A notification (often accompanied by beeping) on the panel indicating an issue, such as low battery, AC power failure, or a tamper condition.
Battery Specifications and Purchasing
Information on the required battery type for your GC2/GC2e panel and where to get it.
Your GC2/GC2e panel requires a specific battery pack for proper operation and backup. Using an incorrect battery can damage your panel or provide insufficient backup time.
- Required Battery Pack Model: 2GIG-BATT2X (or a compatible equivalent meeting the same voltage and mAh specifications).
- Specifications: Typically a Nickel-Metal Hydride (NiMH) pack, often around 7.2V and 2000-2600 mAh (confirm exact specs with your old battery or panel manual if possible, but 2GIG-BATT2X is the standard).
The 2GIG-BATT2X battery pack can often be purchased at local hardware stores, electronics retailers, specialized battery stores, or various online retailers. To inquire about ordering one directly from us or for recommendations, you can text a Support Representative at 469-513-8685.
Important Safety Precautions
Read these safety tips carefully before you begin the battery replacement. Your safety is paramount.
- Always Disarm Your System: Before starting any work, ensure your security system is fully disarmed to prevent accidental alarm activations.
- Always Disconnect AC Power First: Before opening the panel casing, always unplug the panel's AC power transformer from the wall outlet. This is crucial to prevent electrical shock or damage to the panel.
- Prevent Static Discharge: Before touching any internal components or the new battery, discharge any static electricity from your body by touching a grounded metal object (like a metal water pipe or an unpainted metal part of a large appliance).
- Handle Batteries Correctly:
- Do not puncture, crush, short-circuit, or expose the old or new battery to fire or high temperatures.
- Note the polarity if the connector is not keyed, though most are designed to fit only one way.
- Dispose of the old battery according to your local hazardous waste regulations for NiMH batteries. Do not throw it in the regular trash.
- Use Correct Tools: If a screwdriver is needed, use one that fits the screws properly to avoid stripping them.
- Do Not Force Components: Connectors and parts should fit together smoothly. If you encounter resistance, double-check alignment and refer to the instructions or video.
Video Guide
Watch this video for a visual walkthrough of the battery replacement process.
Battery Replacement Instructions
Follow these steps to safely power down the panel, remove the old battery, and install the new one.
-
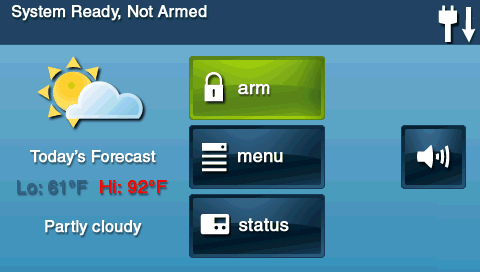
Disarm Your System: Ensure your security system is disarmed at the panel.
-
Disconnect AC Power: Locate your panel's power transformer (the box plugged into a wall outlet) and unplug it. The panel will likely beep and announce "AC Power Loss"; this is normal.
-
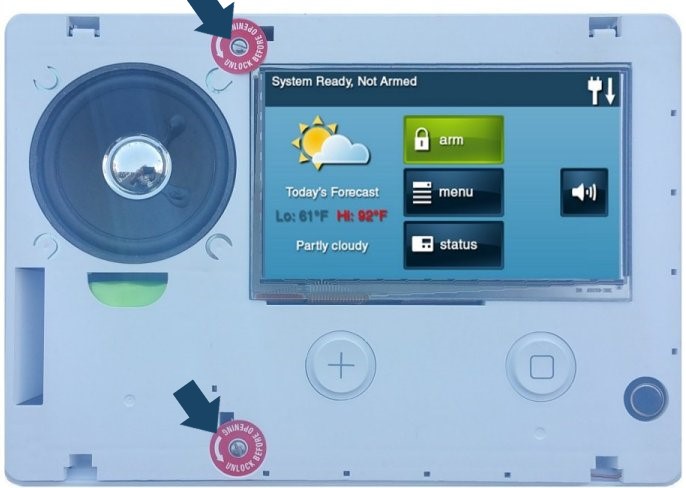
Remove the Front Panel Assembly: This step may vary slightly based on your specific GC2/GC2e installation. The provided images suggest the following:
First, gently pull the main front panel assembly away from the wall or backplate. It might be held by clips or require slight maneuvering.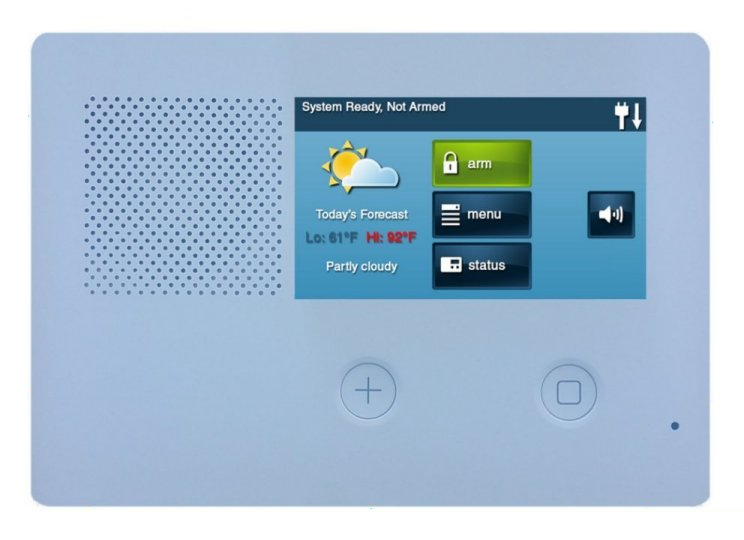
-
Detach Panel from Backplate (If Necessary): If the panel doesn't easily hinge open to reveal the battery after the previous step, you may need to fully detach it. Loosen any retaining screws (often at the top and/or bottom of the panel where it meets the backplate). You might need to use a small flat-head screwdriver to gently pry specific release tabs or slots to separate the panel from its backplate fully. Be cautious and avoid forcing components.
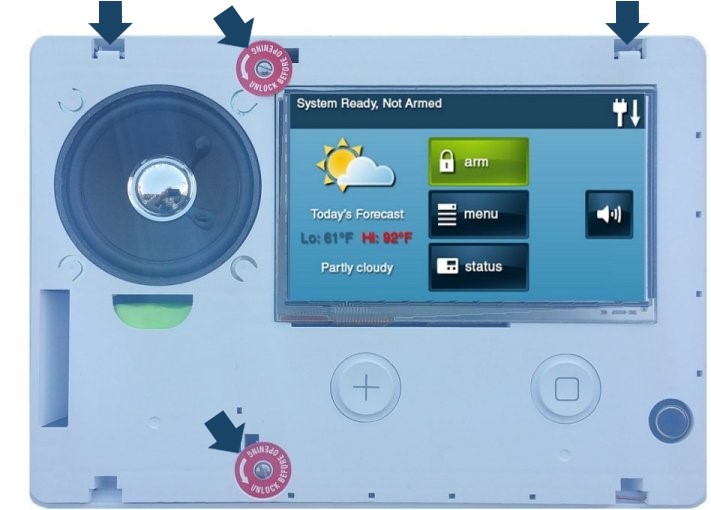
Alternatively, some GC2/GC2e models allow you to open the panel by pressing two tabs on the top edge, which allows the front to swing down, hinged at the bottom. If your panel has these top tabs, try that method first before prying or removing screws for full detachment.
-
Secure the Panel (If Hinged Open): If your panel hinges open, use the plastic retaining strap (if equipped and visible as in the image) to hang the opened panel from the backplate. This provides support and prevents stress on internal wires while you access the battery compartment.
-
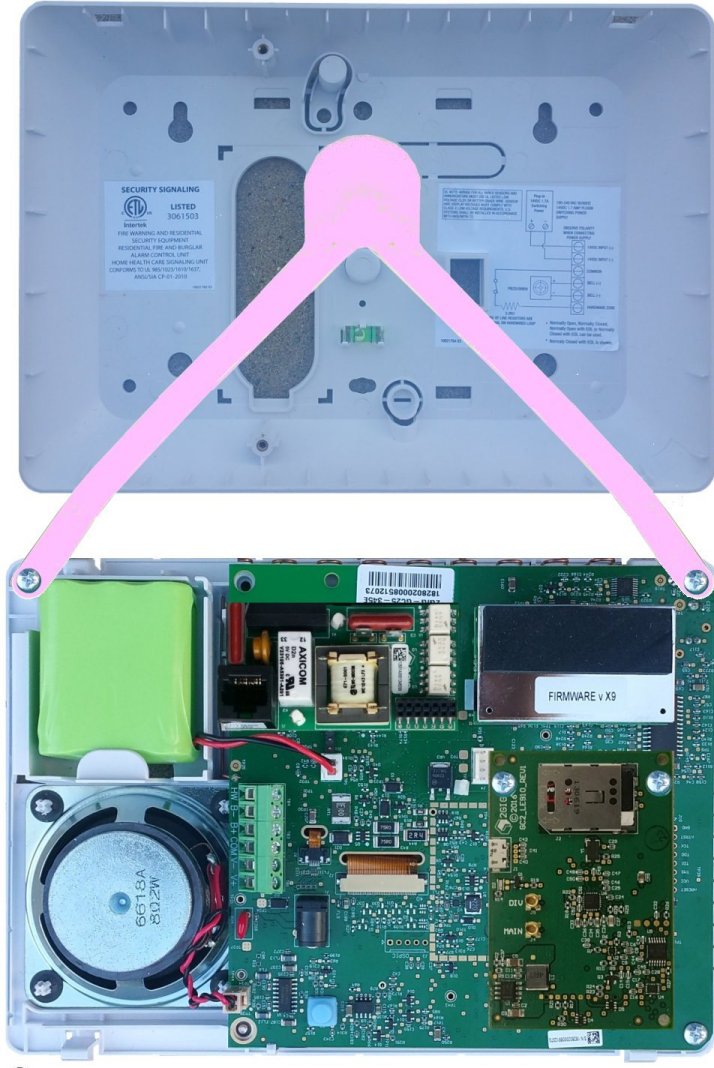
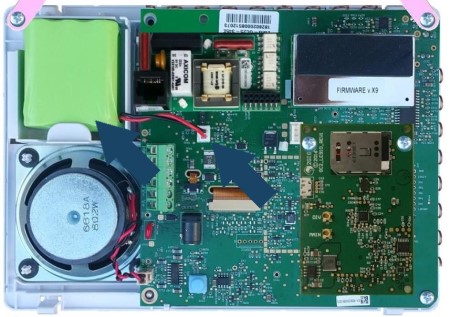
Locate and Disconnect Old Battery: Inside the panel, find the backup battery. It is usually in a dedicated compartment or secured by a plastic holder. Carefully unplug the battery's wire connector from the main circuit board. Note the orientation of the connector if it's not keyed, though most are designed to prevent incorrect insertion.
-
Remove Old Battery and Install New One: Remove the old battery pack from its holder. Install the new 2GIG-BATT2X battery pack (or compatible) in its place. Securely plug the new battery's connector into the circuit board, ensuring it's properly seated and clicks into place if applicable.

-
Close and Secure the Panel: Carefully close the panel by swinging it back up and pressing it firmly against the backplate until it latches or clicks into place, or re-attach it if you fully removed it. Ensure no wires are pinched during this process. If you loosened or removed screws, tighten them now to secure the panel to the backplate.
-
Replace Outer Faceplate (If Applicable): If your specific model had an outer cosmetic faceplate that was removed separately (as implied by the draft's step 6 and its image), reattach it now. (Note: Many GC2/GC2e models do not have a separate faceplate in this manner; the main front unit is the cover.)
-
Restore AC Power: Plug the panel's power transformer back into the electrical outlet. The panel should begin to power up. This may take a few moments.
-
Allow the panel several minutes to fully boot. A "Low Battery" alert is normal at this stage and should clear within 24 hours as the new battery charges.
Clearing Panel Alerts After Replacement
After replacing the battery and restoring power, you'll likely need to acknowledge system alerts on your GC2/GC2e panel.
Follow these steps to clear the error alert and stop any associated alert beeping:
-
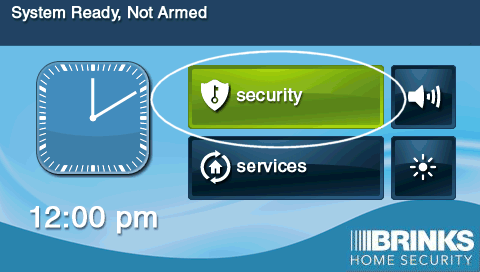
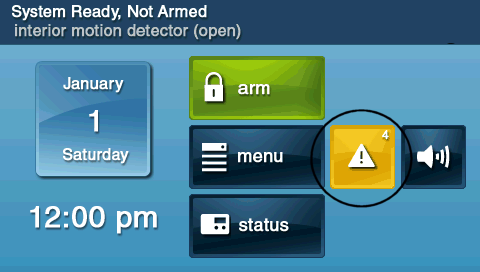
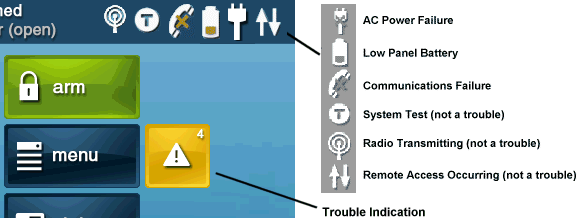
On the main screen of your GC2/GC2e panel, press the Security button. If there are active trouble conditions, you will often see a yellow triangle or similar trouble indicator. Tap this Trouble Indicator (yellow triangle button in the example images).
-
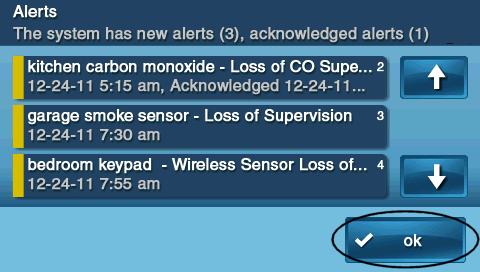
The panel will display a list of current trouble conditions (e.g., "AC Loss," "Panel Low Battery"). Use the up/down arrow keys on the screen to scroll through the alerts if there are multiple. To acknowledge and silence them, press OK. This typically silences the beeping for a set period (e.g., 4 hours for GC2/GC2e) or until the condition clears or is re-triggered.
-
After pressing OK, you'll often be returned to the disarmed screen. Check the top status bar or the trouble icon area on the main screen to see if other alerts persist or if the indicator has cleared (it may take time for a "Low Battery" to clear as the new battery charges).
Important: Acknowledging an alert silences the beeper but does not resolve the underlying cause. Ensure the physical issue (like AC power or battery charge) is truly resolved for the alert to clear permanently.
Troubleshooting Post-Replacement
Addressing common issues that may occur after replacing the GC2/GC2e panel battery.
"Panel Low Battery" Alert Persists After 24 Hours
- Verify Charge Time: Ensure the panel has been continuously powered by its AC transformer for at least 24 full hours to allow the new battery to charge completely.
- Check Battery Connection: Carefully (after disarming and unplugging AC power again) re-open the panel and double-check that the new battery is securely plugged into the mainboard. Ensure the connector is fully seated and oriented correctly.
- Confirm Correct Battery Model: Verify that the replacement battery is indeed a 2GIG-BATT2X or a fully compatible equivalent meeting the panel's voltage and capacity requirements.
- Acknowledge Alert Again: After 24 hours of charging, try acknowledging the trouble alert again as described in the "Clearing Panel Alerts" section.
- Potential Faulty Battery or Panel Issue: If the alert still persists after these steps and sufficient charging time, the new battery itself might be faulty, or, less commonly, there could be an issue with the panel's charging circuitry. In this case, please contact us for further assistance.
Panel Does Not Power On After Battery Replacement
- Check All Power Connections:
- Ensure the new battery is correctly and securely plugged into the panel's circuit board.
- Verify the AC power transformer is firmly plugged into a working electrical outlet and that its wire is securely connected to the panel's power input terminals (if it's a direct wire connection) or that the panel is properly seated on the backplate where AC power pins make contact.
- Outlet Has Power: Confirm the electrical outlet the transformer is plugged into is working by testing it with another device you know is functional (like a lamp). Check if the outlet is controlled by a switch or if a circuit breaker has tripped.
- Try Old Battery (If It Had Some Charge): If you still have the old battery and it had some residual charge, you could (after fully powering down again by unplugging AC) temporarily reinstall it to see if the panel powers on. This can help determine if the issue might be with the new battery (e.g., completely dead on arrival) or the panel itself. If it powers on with the old battery, the new battery is suspect.
- If the panel still does not power on after checking all connections, please contact us.
Panel Beeps Continuously or Shows Other Trouble Alerts
- Acknowledge Trouble Alerts: This is the most common reason for beeping after a power event like a battery replacement. Follow the steps in the "Clearing Panel Alerts After Replacement" section carefully.
- Check for "AC Power Failure" Alert: If this specific alert is showing, re-verify that the AC power transformer is plugged in securely to a working outlet and that the panel is receiving this power. Loose connections at the panel's power terminals can also cause this.
- Ensure Panel is Closed Correctly: Make sure the panel's cover is properly closed and latched or screwed shut. If the panel casing is not secured correctly, a tamper condition might be triggered (if the opening method affected the tamper switch), leading to a "Panel Tamper" or "Cover Tamper" alert.
- Review All Alerts: If beeping continues after acknowledging known alerts, go back into the Alerts/Troubles menu to see if new or different alerts have appeared that need specific attention. Refer to your panel's user manual for descriptions of other trouble conditions if necessary.
Further Assistance
How to get more help if you encounter issues during or after the battery replacement for your GC2/GC2e panel.
If you have followed these instructions and are still experiencing problems with your GC2/GC2e panel's battery, or if you are uncomfortable performing any of these steps, please don't hesitate to contact us. You can text a Support Representative anytime at 469-513-8685. Please be ready to describe the issue and the steps you've already taken.