2GIG GC2/GC2e Panel Guide
Summary: This guide covers the basic setup, features, and common user functions for your 2GIG GC2 or GC2e GoControl security panel. It includes panel specifications, instructions for arming/disarming, power cycling, and an overview of communication options like Wi-Fi and cellular.
Table of Contents
Navigate through the sections to learn about your panel.
- Video Instructions
- Common Terms
- Panel Overview: Specifications & Key Features
- Setting Up Network Communication
- Basic User Functions
- Z-Wave Smart Home Control
- LED Status Reference
- Troubleshooting Common Issues
- Optional Modules & Accessories
- Advanced Options (e.g., Factory Reset)
- Further Assistance
Video Instructions
This brief instructional video demonstrates how to perform basic functions on the 2GIG GC2 panel. Many operations are similar for the GC2e.
(Note: The video link above is a placeholder from the draft and needs to be replaced with a valid YouTube embed URL.)
Common Terms
Understanding these terms will help you use your GC2/GC2e panel effectively.
- GC2/GC2e Panel
- Your 2GIG Go!Control security system's main control unit with a touchscreen interface.
- Sensor (Zone)
- Devices like door/window contacts, motion detectors, or smoke detectors that report to your panel.
- Arm (Away/Stay)
- To activate your security system. "Arm Away" activates all sensors for when no one is home. "Arm Stay" activates perimeter sensors but typically leaves interior motion sensors off.
- Disarm
- To deactivate your security system using a valid user code.
- User Code/Master Code
- 4-digit codes used to operate the system. The Master Code has higher privileges.
- Toolbox
- A menu on the panel for accessing user and system functions.
- Z-Wave
- A wireless communication protocol for smart home devices (lights, locks, thermostats) that can be controlled by your panel.
- Cellular Module
- An internal component that allows your panel to communicate with a central monitoring station over cellular networks.
- Go!Bridge Module
- A module (for GC2) that connects to your internet router via Ethernet cable to enable IP communication features for the panel, including potential Wi-Fi based notifications or remote services (often in conjunction with an XCVR-345 module in the panel).
- XCVR-345 Module
- A transceiver module used in the GC2 panel that communicates with sensors and potentially with other modules like the Go!Bridge.
- eSeries Sensors
- Newer encrypted sensors from 2GIG, compatible with the GC2e panel, offering enhanced security.
- Power Cycle
- Restarting the panel by removing all power (AC and battery) and then restoring it, used for troubleshooting.
- Two-Way Voice
- A feature allowing direct voice communication with the central monitoring station through the panel's built-in microphone and speaker during an alarm event.
Panel Overview: Specifications & Key Features
Learn about the capabilities of your 2GIG GC2 and the upgraded GC2e panels.
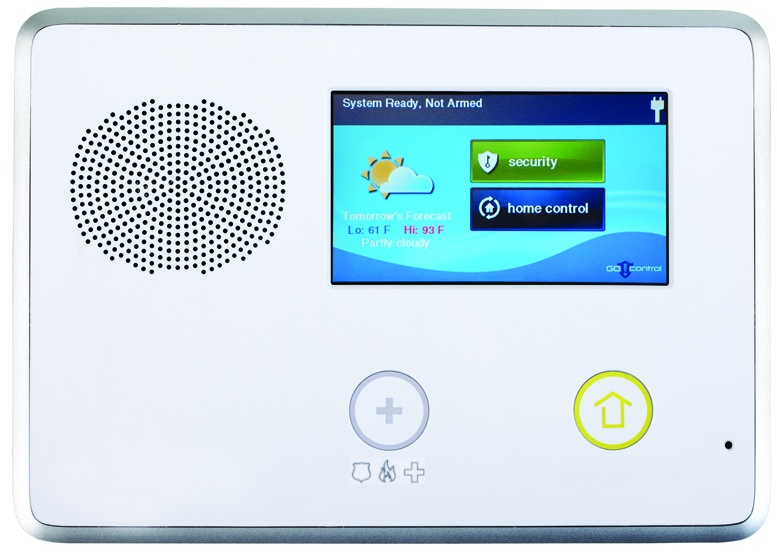
2GIG GC2 GoControl Panel
Key Specifications & Features:
- Built-in speaker and microphone for two-way audio communication with the monitoring station (if supported by your service), local alarm sounds, and voice prompts for system status.
- 3.75" x 2.25" color resistive touchscreen display for system control and information.
- Dedicated, illuminated Emergency (Panic) button with indicator light for quick access to police, fire, or medical alerts.
- Illuminated Home button with an LED status indicator light (e.g., green for ready/AC power, red for alarm).
- Supports Z-Wave smart home devices (lights, locks, thermostats, etc.) for automation.
- Capacity for up to 60 wireless sensor zones and 2 hardwired zones.
- Supports an optional cellular radio module for primary or backup communication to the monitoring station.
- Can be controlled remotely via mobile apps (like the Brinks Home™ Mobile App, often through Alarm.com services, which requires a compatible communication module and service plan).
- Displays date, time, and can show weather forecasts (requires communication service).
- Allows configuration of rules for quick arming/exit procedures.
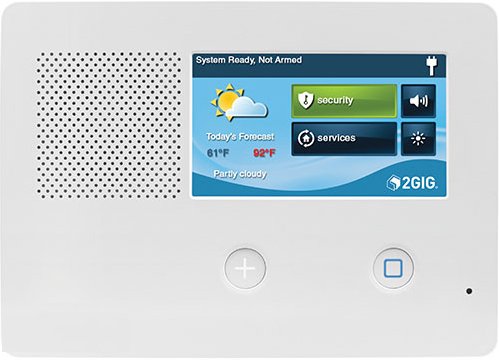
Features Unique to the Upgraded 2GIG GC2e Panel
The GC2e is an enhanced version of the GC2 with several improvements:
- Improved, larger 5" color capacitive touchscreen display for better clarity and responsiveness.
- Maintains compatibility with older 2GIG sensors and Alarm.com communication modules.
- Adds compatibility with new 2GIG eSeries encrypted sensors for enhanced wireless security.
- Features photo slideshow capability and potential for video playback (depending on firmware and services).
- Includes Z-Wave Plus with S2 encryption for more secure and efficient smart home device communication.
- Enhanced two-way voice functionality for clearer communication during emergencies.
Setting Up Network Communication
Your panel requires a communication path (Cellular, Wi-Fi via module, or sometimes Landline) to send signals to a monitoring center and support remote services.
Wi-Fi Network Setup (for GC2 via Go!Bridge)
To enable Wi-Fi based communication features for a 2GIG GC2 panel (such as IP reporting or enhanced notifications, often in conjunction with a service like Alarm.com), you typically need specific hardware, as the GC2 panel itself does not have built-in Wi-Fi:
- 2GIG Go!Bridge IP Communicator: This module connects directly to your internet router using an Ethernet cable.
- 2GIG XCVR-345 Transceiver Module: This module must be installed in your GC2 panel. It allows the panel to communicate wirelessly with your sensors and also with the Go!Bridge module.
Once these modules are installed and your Go!Bridge is connected to your router, the system can use your internet connection for communication, often configured through your alarm service provider. The GC2e panel may also use similar external modules or specific Alarm.com System Enhancement Modules (SEMs) that provide Wi-Fi connectivity.
Note: A cellular communication module is generally recommended as the primary or a reliable backup communication path, even if Wi-Fi is used, as it's not dependent on your internet service.
Cellular Communication
Most 2GIG GC2/GC2e panels rely on a cellular module for primary or backup communication with the central monitoring station. This module must be installed and activated with a service plan.
- Check Status: You can usually check the cellular module's status and signal strength through the panel's Toolbox menu (often under System Tests > Cellular Test, or About > Cellular after entering Master or Installer code).
- Module Upgrades: If you have an older 3G cellular module, it will no longer function due to carrier 3G network shutdowns and must be upgraded to an LTE module.
Basic User Functions
Learn how to perform common daily operations on your GC2/GC2e panel.
Arming in Away Mode
Use Arm Away when everyone is leaving the premises.
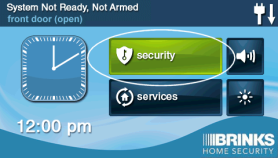
- From the Home screen, press the SECURITY button.
- Press the ARM button.
- Press the AWAY button. The exit delay countdown will begin.
- Ensure all doors and windows are closed, and exit before the countdown finishes.

Arming in Stay Mode
Use Arm Stay when people will remain inside the premises.
- From the Home screen, press the SECURITY button.
- Press the ARM button.
- Press the STAY button. The exit delay (if enabled for Stay mode) or an instant arming sequence will begin.
- Interior motion sensors are typically bypassed automatically in Stay mode.
Disarming the System
To turn off your security system (e.g., when entering an armed home or after an alarm).
- When you enter through a designated entry/exit delay door, the panel will start beeping to indicate the entry delay period.
- Promptly enter your 4-digit User Code or Master Code on the panel's keypad.
- The panel should announce "System Disarmed" and stop beeping. If disarming from an alarm state, this will also silence the siren.

Using Panic Buttons
For immediate help in an emergency (Police, Fire, or Medical).
- On the panel's home screen (or a dedicated physical button area on some models), press the Panic access button (often an emergency icon or " ∗ ").
- The panel will display options for different emergency types. Press and hold the button for Police, Fire, or Medical/Emergency for at least two seconds.
- The panel will send an immediate signal to the monitoring center. Use responsibly.
Z-Wave Smart Home Control
Your GC2/GC2e panel can control a variety of Z-Wave smart home devices.
The panel acts as a Z-Wave controller, allowing you to add, remove, and control devices like:
- Smart light switches and dimmers
- Z-Wave thermostats
- Smart door locks
- Appliance modules and garage door controllers
To manage Z-Wave devices:
- Press SERVICES on the Home screen.
- Select the Z-Wave logo (stylized "Z").
- Press the wrench icon (tool icon).
- Enter your Installer Code (default 1561) or Master Code (if permissions allow).
- From here, you can access options to "Add Devices," "Remove Devices," and other Z-Wave network functions.
For detailed instructions on adding or removing specific Z-Wave devices, please refer to dedicated guides for those tasks.
LED Status Reference
Understanding the indicator lights on your GC2/GC2e panel.
The primary status indicator is usually the Home button LED:
The Emergency button also has an LED that typically illuminates during certain test modes or if held down to indicate activation.
Troubleshooting Common Issues
Basic troubleshooting steps, including how to power cycle your panel.
Panel Screen is Blank or Unresponsive
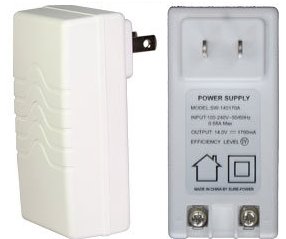
- Check AC Power: Ensure the panel's transformer is plugged securely into a working electrical outlet.
- Check Backup Battery: If AC power is out, the backup battery might be depleted. Restore AC power and allow time for it to charge. If the battery is old (3-5 years), it may need replacement.
- Perform a Power Cycle (Reboot): If the panel has power but is frozen, a power cycle can often resolve it. See instructions below.
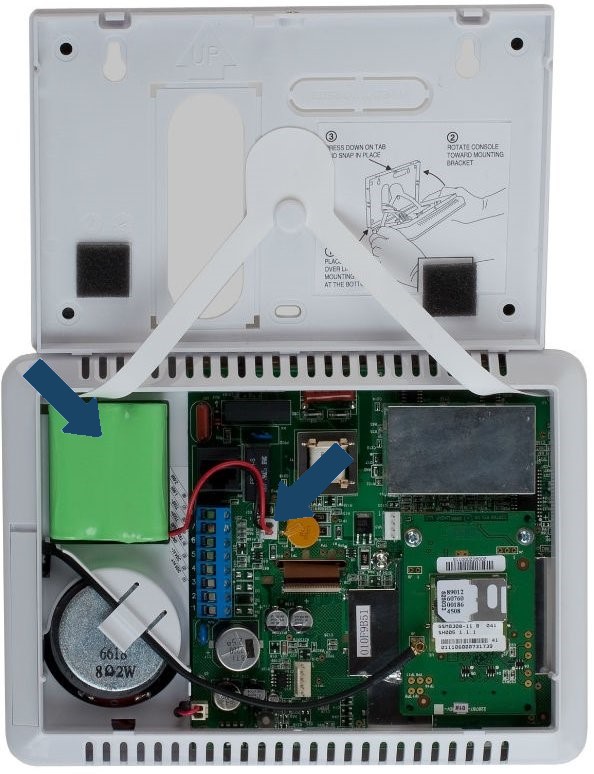
How to Power Cycle the Panel (Reboot)
A power cycle can resolve many minor issues or unresponsiveness.
-
Disarm the System: If possible, disarm your panel using your Master Code or a User Code.
-
Unplug the Power Supply (Transformer): Locate the panel's power transformer (usually a box plugged into a nearby wall outlet) and unplug it.
-
Open the Panel: Remove the top screw (if present) that secures the panel to its backplate. Then, typically by pressing two tabs on the top of the panel, gently pull the top of the panel forward and let it swing down, hinging from the bottom.

-
Disconnect the Backup Battery: Inside the panel, locate the backup battery and unplug its wire connector from the circuit board. Be gentle and pull by the connector, not the wires.
-
Wait: Leave the panel completely without power (both AC and battery) for at least 60 seconds.
-
Reconnect Power: First, plug the backup battery connector back into the circuit board. Then, carefully close the panel, ensuring no wires are pinched, and secure it (replace screw if applicable). Finally, plug the AC power transformer back into the wall outlet.
-
The panel will boot up. This may take several minutes. Once it's fully started, check if the issue is resolved.
Common Trouble Alerts (e.g., Low Battery, AC Loss, Communication Failure)
If your panel is beeping or showing a trouble icon (often a yellow triangle):
- Tap the trouble icon or navigate to the trouble alerts screen (usually via Security > Menu > Alerts or by tapping the icon directly).
- Identify the specific trouble (e.g., "Panel Low Battery," "AC Power Failure," "Sensor X Low Battery," "Communication Failure").
- Address the cause (e.g., restore AC power, replace sensor battery, allow panel battery to charge, troubleshoot communication path).
- Acknowledge the alert on the panel to silence beeping (this is temporary; the cause must be fixed).
Optional Modules & Accessories
Enhance your GC2/GC2e panel's capabilities with these add-ons.
- Cellular Radio Module: Provides primary or backup communication to the central monitoring station over cellular networks (e.g., LTE). Highly recommended for reliable alarm reporting.
- 2GIG Go!Bridge IP Communicator: (Primarily for GC2) Connects to your internet router to enable IP-based communication features, often used in conjunction with services like Alarm.com for remote control and notifications. Requires an XCVR-345 module in the panel.
- 2GIG XCVR-345 Transceiver Module: A necessary component in the GC2 panel for communication with 2GIG wireless sensors and certain communication modules like the Go!Bridge.
- eSeries Encrypted Sensors: (For GC2e) Offer enhanced security through encrypted wireless communication between the sensor and the GC2e panel.
- Z-Wave Devices: A wide array of smart home devices such as light switches, dimmers, thermostats, door locks, and appliance modules that can be integrated and controlled by your panel.
- Wireless Keyfobs and Panic Buttons: For convenient remote arming/disarming and portable emergency signaling.
Advanced Options (e.g., Factory Reset)
Information on more advanced panel operations like factory reset.
Warning: Performing a factory default reset on your 2GIG GC2/GC2e panel will erase all custom programming, including sensor configurations, user codes, Z-Wave devices, and communication settings. This action should only be taken as a last resort by qualified individuals or under the direct guidance of technical support, as it will render your system non-functional until fully reprogrammed. You must contact us after any such reset: 469-513-8685.
A factory reset is an advanced procedure typically found within the Installer Toolbox (requiring the Installer Code) and should not be performed without understanding the consequences. If you are experiencing severe issues with your panel that basic troubleshooting cannot resolve, please contact technical support before considering a factory reset. They can guide you on whether it's appropriate or if other solutions should be tried first.
Further Assistance
How to get more help with your 2GIG GC2/GC2e panel.
If you have questions about any of the features or functions described in this guide, encounter issues not covered in the troubleshooting section, or need support with your 2GIG GC2/GC2e panel, our representatives are ready to assist. You can text a Support Representative anytime at 469-513-8685. Please be ready to describe your issue or question clearly.