Video Motion Detection Rules Guide
Video Motion Detection (VMD) rules are Alarm.com's original motion detection capability. VMD rules are supported on the following camera models:
- 2GIG HD100 Video Camera
- ADC-V700X Outdoor Camera
- ADC-V510 Indoor Fixed Lens Camera
- ADC-V610PT Indoor Pan/Tilt Camera
- ADC-VS1 1 Channel Video Server
- ADC-VS120 1 Channel Video Server
- ADC-VS121 1 Channel Video Server
- ADC-VS123/NV432-V2 HD Video Server
- ADC-VS420 4 Channel Video Server
- ADC-V520 Indoor Fixed Camera
- ADC-V520IR Indoor Fixed Camera
- ADC-V620PT Indoor Fixed Pan/Tilt Camera
- ADC-V720 Outdoor PoE Camera
- ADC-V720W Outdoor Wireless Camera
- ADC-V820 Indoor Dome Camera
- ADC-V521IR Indoor Fixed IR Camera
- ADC-V721W Outdoor Wireless Camera
- ADC-V821 Indoor/Outdoor Mini Dome Camera
- ADC-VC725 Indoor/Outdoor Mini Bullet Camera
- ADC-VC825 Indoor/Outdoor Dome Camera
Notice: Beginning February 2023, newly created video accounts will no longer have the option to create VMD recording rules. This change comes as Alarm.com confidently moves forward with Video Analytics as the premier motion recording solution. This change will not affect any accounts created prior to this date. Alarm.com camera models that support VMD recording will continue to be able to use VMD recording rules after the cutoff date.
How to Create a VMD Rule
To create or adjust a VMD rule:
- Log in to the Alarm.com desktop website.
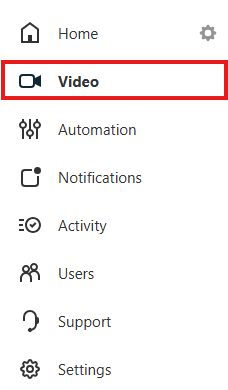
- Click Video.
- Click Recording Rules.
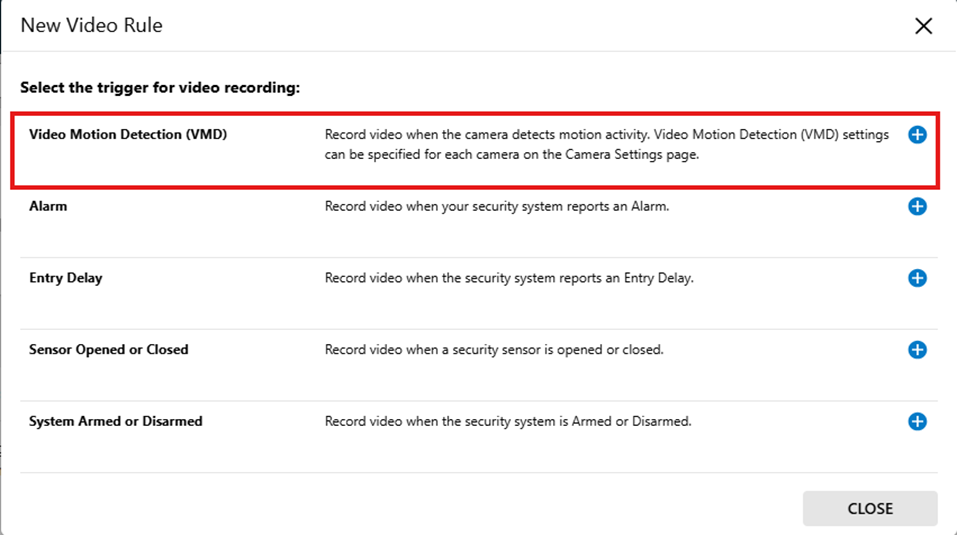
- Click + Add New Rule.
- Click Video Motion Detection (VMD).
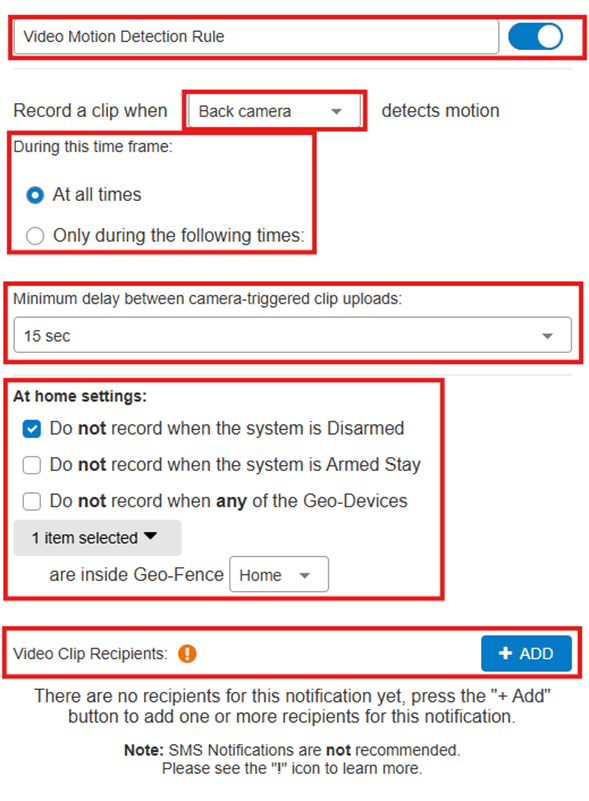
- Adjust the following rule settings to your requirements:
- Name the rule.
- Select the video device.
- Adjust time frame.
- Select a minimum delay between clip uploads.
- At home settings.
- Add recipients.
- Review settings and click Save Rule.



Once the VMD rule has been created, you will need to configure VMD windows for the rule.
How to Configure VMD Windows
To configure VMD windows:
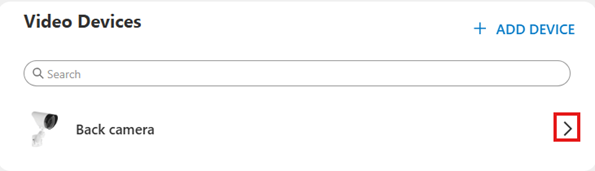
- Click Settings.
- Select the video device.
- Select Overview.
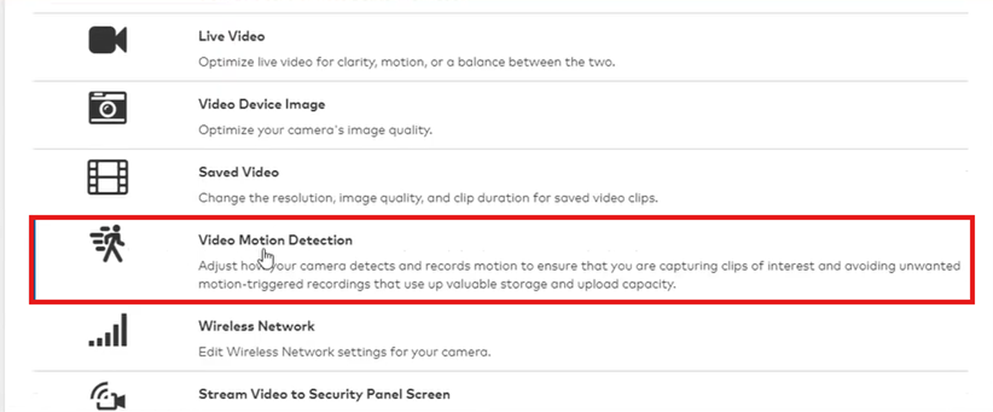
- Click Video Motion Detection.
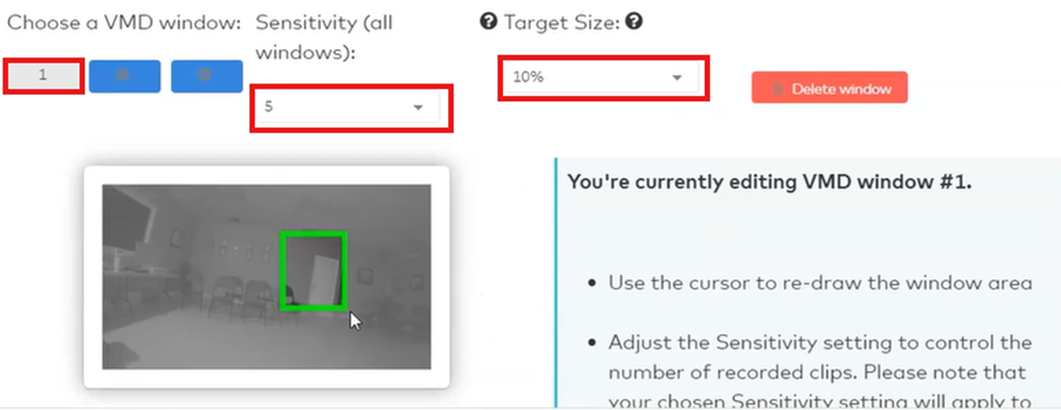
- Adjust the following window settings to your requirements:
- Select VMD window to create/edit.
- Adjust sensitivity.
- Adjust target size.
- Draw VMD window.
- Scroll down and click Save Changes.
- Repeat instructions for the remaining windows.
- Test window settings by walking into the camera view and check if a clip is recorded.


Tips and Best Practices
Window Locations and Sizes
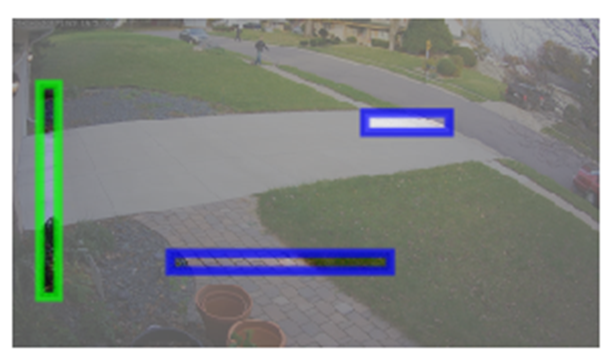
A video device's VMD windows works best if you position them like a tripwire. Create long, narrow boxes in areas that must be passed through to reach the area of interest. Keep in mind that it is recommended to avoid placing VMD windows in highly dynamic areas like large reflective surfaces, large areas where shadows often move, or trees and bushes that move due to wind.
Examples of correctly placed VMD windows:

Target Size
The target size setting is the percentage of the window that observes movement to trigger a recorded clip. If the target size is too large, the camera may not trigger for anything less than the size of a car. If the target size is too small, leaves blowing in the wind may trigger recordings. It is recommended to estimage the percentage or a window that a person (or whatever you are wanting to record) would fill, then select one size larger.
Sensitivity
The sensitivity settings is a measure of how drastic the movement is to trigger a recorded clip. The higher the sensitivity, the less motion is needed to trigger a clip. If the sensitivity is too high, the camera may trigger constantly. Note, for the ADC-V521IR, ADC-V522IR, and ADC-V722W models, the sensitivity setting affects all VMD windows for the specific device.
At-Home Settings
When enabled, the at-home settings pause recording rules when the system is disarmed, or a Geo-Device is inside the Home Geo-Fence. This can help prevent unwanted or unnecessary recordings.
If you need further assistance, text us at 469.513.8685 or chat with us 24/7 for an immediate response.