2GIG GC2/GC2E—Sensor Malfunction - Troubleshooting Guide
Summary: This guide will walk you through troubleshooting common sensor malfunctions on your 2GIG GC2 or GC2e security system. You'll learn to identify causes like battery issues, distance limitations, or interference, and how to perform a sensor test to help restore your system's full functionality.
Table of Contents
Quick links to help you diagnose and fix sensor issues.
- Common Terms
- Understanding Common Sensor Issues
- Troubleshooting Sensor Malfunctions
- How to Perform a Sensor Test
- Further Assistance
Common Terms
Familiarize yourself with these terms related to sensor troubleshooting.
- GC2/GC2e Panel
- Your 2GIG Go!Control security system's main control unit.
- Sensor (Zone)
- A device (e.g., door/window contact, motion detector) that detects specific events and reports them to the panel. Each sensor is programmed as a "zone."
- Sensor Malfunction
- An issue where a sensor is not operating correctly, such as failing to detect events, reporting false alarms, or showing a trouble condition on the panel.
- Sensor Battery
- The power source for wireless sensors. A dead or low battery is a common cause of malfunctions.
- RF (Radio Frequency) Interference
- Disruption of the wireless signals between sensors and the panel, caused by other electronic devices or physical obstructions.
- Tamper Error/Alert
- A notification indicating that a sensor's cover or casing is open or not properly secured.
- Sensor Test (Roll Call)
- A diagnostic mode on the panel used to check the communication status and signal strength of each programmed sensor.
- Master Code
- Your primary 4-digit user code, required to access system functions like the Toolbox for performing a sensor test.
- Toolbox
- A menu on the GC2/GC2e panel that provides access to various user and system functions.
- Signal Strength (Sensor)
- An indication of the wireless signal quality between a specific sensor and the main panel, often displayed during a sensor test.
- Loss of Supervision
- A trouble condition reported when the panel has not received a regular check-in signal from a wireless sensor, often due to low battery, range issues, or interference.
- Trouble Alert
- A notification on the panel indicating a system issue, such as a sensor malfunction, low battery, or tamper.
Understanding Common Sensor Issues
Learn about the typical reasons why your security sensors might malfunction.
Sensor malfunctions can compromise your security system's effectiveness. Common causes include:
- Dead or Low Sensor Battery: Wireless sensors rely on batteries. When they get low or die, the sensor may stop communicating with the panel or send erratic signals.
- Sensor Too Far from Panel: Wireless sensors have a limited range (the draft mentions "over 100 feet" as a potential issue for GC2, but this can vary based on home construction). If a sensor is at the edge of or beyond this range, its signal may be weak or intermittent.
- Radio Frequency (RF) Interference: Other wireless devices (like Wi-Fi routers, cordless phones, baby monitors, microwave ovens, or even some gaming controllers) or large metal objects (refrigerators, large TVs, metal framing) can interfere with the radio signals between your sensors and the panel.
- Physical Damage or Misalignment: Sensors or their magnets (for door/window contacts) can get damaged, knocked out of alignment, or blocked by obstructions, preventing them from working correctly.
- Tamper Switch Activated: If a sensor's cover is loose, not properly closed, or has been removed, its internal tamper switch will trigger a trouble alert.
- Environmental Factors: Extreme temperatures, humidity, or pests can sometimes affect sensor performance, especially for sensors placed in less controlled environments like garages or sheds.
- Defective Sensor: Although less common, the sensor itself could be faulty and require replacement.
Troubleshooting Sensor Malfunctions
Follow these recommendations to identify and resolve common sensor issues. The panel will usually indicate which sensor (zone) is experiencing a problem.
1. Address "Sensor Low Battery" Alerts
- Identify the specific sensor reporting a low battery from the panel's display.
- Carefully open the sensor casing.
- Note the type and orientation of the existing battery.
- Replace it with a new battery of the exact same type and ensure correct polarity (+/-).
- Securely close the sensor cover. The low battery alert on the panel may take some time (from a few minutes to a few hours) to clear as the sensor sends its updated status.
2. Address "Sensor Tamper" Alerts
- Identify the sensor reporting a tamper.
- Inspect the sensor and ensure its cover is fully closed and securely fastened or snapped into place.
- If the cover seems damaged or won't stay closed, the sensor casing might need replacement.
- Once secured, the tamper alert should clear on the panel (you may need to acknowledge it).
3. Address "Loss of Supervision" or Sensor Not Responding
- Replace the Sensor Battery: This is the most common cause. Even if not yet reporting "low battery," an aging battery can cause intermittent communication.
- Check for RF Interference:
- Have any new powerful electronic devices (Wi-Fi routers, smart speakers, baby monitors, microwave ovens) been placed near the affected sensor or the main panel recently?
- Try temporarily turning off or relocating suspect devices to see if the sensor communication restores.
- Avoid placing the panel or sensors directly next to large metal objects (refrigerators, TVs, metal studs/siding) which can block or reflect signals.
- Verify Sensor Range:
- Is the sensor particularly far from the panel (e.g., in a detached garage or at the opposite end of a large house)? The typical open-air range is often cited around 100-350 feet for 2GIG sensors, but this is significantly reduced by walls, floors, and interference.
- If the sensor previously worked and hasn't been moved, range is less likely the issue unless something new is obstructing the signal path.
- Perform a Sensor Test: Use the Sensor Test instructions below to check the signal strength from that specific sensor to the panel. Weak signal can confirm range or interference problems.
- Inspect for Physical Damage or Misalignment: Ensure the sensor and its magnet (if applicable) are still correctly positioned and not damaged.
4. Sensor Causing False Alarms
- Identify the Faulting Sensor: Note which sensor is triggering the false alarms from the panel's event history or display.
- Check for Environmental Causes:
- For motion sensors: Ensure they are not aimed at heaters, air vents, curtains that move, pets (unless using pet-immune sensors correctly positioned), or windows where moving tree branches or car headlights might trigger them.
- For door/window sensors: Ensure the door/window is closing tightly and not loose, and that the sensor and magnet are aligned properly with a small gap (typically 1/4 to 1/2 inch).
- Inspect Sensor and Wiring (if hardwired, though GC2 primarily uses wireless): Check for loose connections, damage, or moisture.
- Low Battery in Wireless Sensor: Sometimes a dying battery can cause erratic behavior before a "low battery" signal is consistently reported. Try replacing the battery.
- Interference: Severe RF interference could potentially cause false triggers in some cases.
- Defective Sensor: If other causes are ruled out, the sensor itself might be faulty.
General Recommendation if Issues Persist
- If troubleshooting does not resolve the sensor malfunction, perform a Sensor Test (see instructions below) to gather more information about its signal and panel response.
- If a sensor consistently fails tests or causes problems despite troubleshooting, it may be defective and require replacement.
How to Perform a Sensor Test
Follow these step-by-step instructions to test the communication between your sensors and the GC2/GC2e panel. This can help identify if a sensor is signaling correctly and check its signal strength.
-
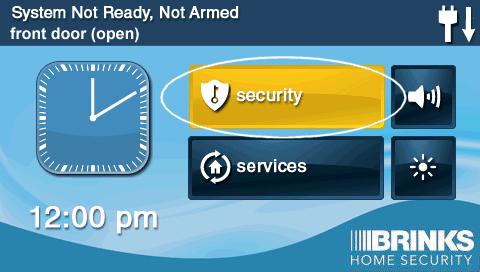
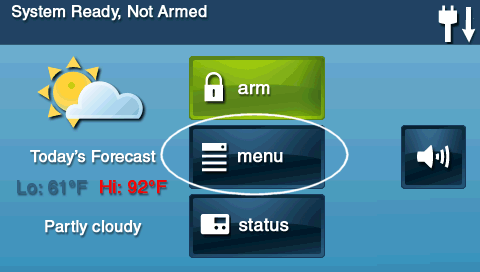
From the panel's Home screen, press SECURITY, then press MENU.
-
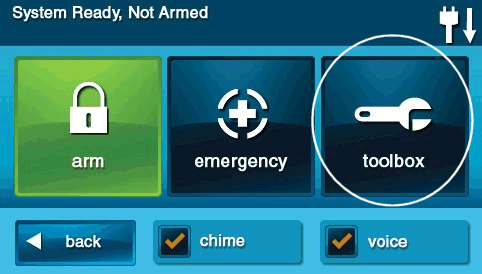
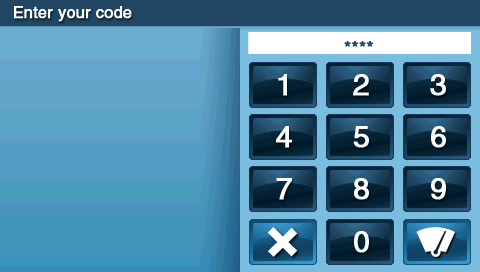
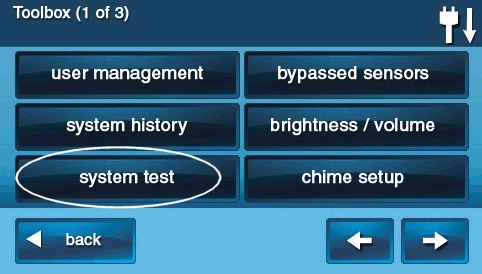
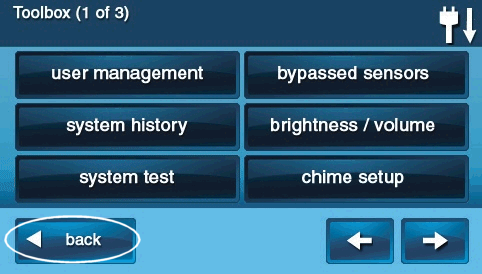
Press TOOLBOX. The panel will then prompt you to enter your 4-digit code. Enter your Master Code.
-
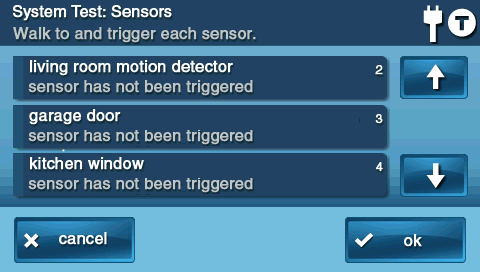
In the Toolbox menu, press SYSTEM TEST. The panel will announce it is entering test mode and will display a list of your sensors or prompt you to start testing.
-
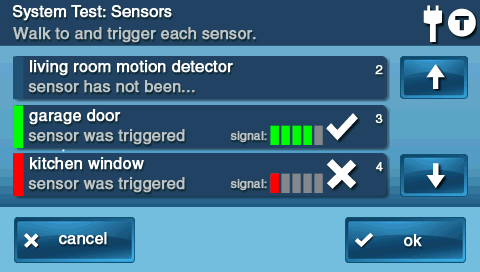
Individually trigger each sensor you wish to test:
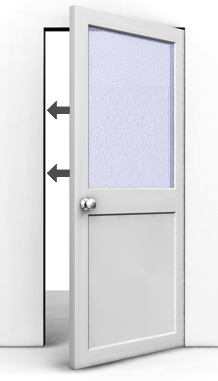
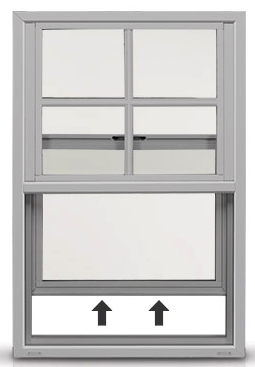
- For door and window sensors, open and then close the door or window.
- For motion detectors, walk in front of the detector to create movement. Allow a minute for it to reset before re-testing if needed.
-
As each sensor is triggered, the panel should beep and verbally announce the sensor's name or zone. The screen will also typically display the activated sensor and its signal strength (often 1 to 5 bars). If all sensors you test respond and show adequate signal strength, press OK to continue with other panel tests (like button or sounder tests, if prompted) or to conclude the sensor test portion.
-
After completing all desired tests (sensors, console buttons, sounder as prompted by the panel), press the BACK button (arrow icon) or the HOME button repeatedly to exit the System Test mode and return to the main screen.
Further Assistance
How to get more help if you continue to experience sensor malfunctions.
If you have followed these troubleshooting steps and performed a sensor test but are still experiencing issues with one or more sensors, or if a sensor consistently fails the test, it may require professional attention or replacement. For additional support, please chat with us or text a Support Representative any time at 469-513-8685. Be ready to provide details about the problematic sensor and the steps you have already taken.