How to Add a Z-Wave Device to the GC3 Panel
Step-by-Step Instructions:
1. Press System Settings, then enter the default installer code 1561.


2. Press Smart Home Settings, then press Add Devices.


3. The GC3 enters Z-Wave learn mode.

4. As the system enters learn mode, trigger the sensor you want the system to learn. Steps for triggering common sensors are shown below. To skip to step 5, click here.

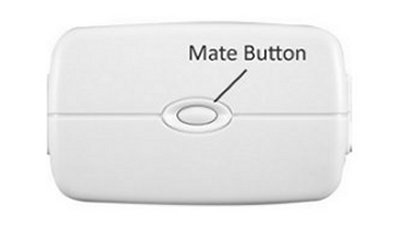
GE Jasco Plug-in Lamp Appliance Module
Double click the mate button twice.
FortrezZ SSA1 Indoor Siren
Bring the siren within 6 ft. of the GC3 panel, then press the program switch twice.

Everspring SE812 Indoor Siren
Press the link button inside the battery compartment 3 times.

GE Jasco Wall Dimmer Light Switch
Turn the light switch on and off.
GE Jasco Wall AC Outlet
Double click button in the middle of the outlet.

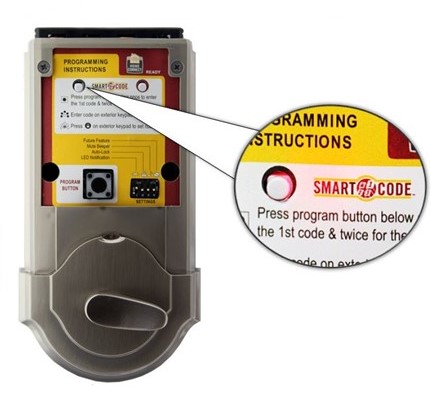
Schlage Deadbolt
- Enter the 6-digit programming code provided in the Schlage documentation.
- Press Schlage, then 0. The Schlage button flashes orange.

Kwikset Deadbolt
- Open the battery cover and press the button beside SmartCode.

Yale Touchscreen Deadbolt:
- Touch the screen with the back of your hand or fingers to activate.
- Enter the 4 to 8-digit master code, then press #. The lock should sound a happy tone.
- Press 7, then press # to enroll. The lock should again sound a happy tone.

GE Radio Thermostat CT20 Basic Thermostat
Remove the top cover, then press the mate button.

Alarm.com ADC-T2000 Thermostat
1. Press the mode button to display the temperature, then press the mode button again until heat/cool icons disappear.

2. Hold the down arrow until the radio wave icon appears below the temperature display.

Alarm.com ADC-T3000 Thermostat
1. Press the menu button to display the menu, then press the down arrow until you get to settings.


2. Press the enter button to select Settings, then press the down arrow until you get to network.


3. Press the enter button to select Network, then press the up or down arrow to highlight Add.


4. Press the enter button to select Add. The Z-Wave learn mode will start.


5. Learning may take up to 1 minute to complete and exit.

Radio Thermostat CT30, CT100, CT100+ and CT101

- 1. Press Menu button. The screen will display r1.
- 2. Press Mate under antenna icon twice, then the screen will display Link if successfully learned.


Radio Thermostat CT110
- Press left side Antenna button.

GoControl or RCS Technologies TBZ-48
- 1. Hold Fan for 5 seconds until Setup appears, then press the up arrow until Z-Wave displays onscreen.
- 2. Press Mode to select, then press Mode again to learn.
- 3. If successful, press Fan to exit. The antenna icon appears by temperature display.


Trane Thermostat
- Press Menu (the left button) twice.
- Scroll to Z-Wave Install, then press Select.


Linear GoControl Garage Door Controller
Press the mate button. The Linear controller sounds 1 beep then 3 beeps when successful.

The below steps are continued from step 3 above the device pairing examples.
5. Learning may take up to 1 minute. When finished, press Ok.


6. Press Rename, enter the light module name, then press Done.


7. Press the back arrow or press the home button to exit.

