2GIG-PIR1E-345 Motion Detector Guide
Summary
The 2GIG-PIR1-345 / PIR1E-345 Passive Infrared (PIR) Motion Detectors provide reliable indoor motion detection with a 30′×50′ coverage area, pet-immune optics, and wireless supervision. This guide walks you through specs, common terms, installation, programming, testing, pet-immunity setup, troubleshooting, and LED indicators.
Table of Contents
- Specifications
- Video Instructions
- Common Terms
- Installation & Mounting
- Programming to Your Panel
- Walk-Test
- Pet Immunity Setup
- Advanced Installation Tips
- Troubleshooting
- LED Indicator Guide
- Reference Manual
Specifications
- Detection Range: 30′ deep × 50′ wide
- Frequency: 345 MHz, supervised every 70 min
- RF Range: Up to 100′ to panel
- Battery: 1× CR123A 3 V Lithium (≈5 yr life)
- Operating Temp: 32°F–120°F (non-pet), 50°F–90°F (pet-immune)
- Compatibility:
- 2GIG-PIR1-345: GC2, GC2e, GC3, GC3e (with 2GIG-XCVR2-345)
- 2GIG-PIR1E-345 (encrypted): GC2e, GC3e only
2GIG-PIR1-345 / PIR1E-345 Motion Detector
Video Instructions
Watch this step-by-step installation walkthrough:
Common Terms
- Supervision
- Periodic “heartbeat” signal that confirms the device is active and connected.
- Walk-Test
- A test mode where the detector’s LED flashes on motion to verify coverage.
- Pet Immunity
- Low-sensitivity setting/jumper to ignore small pets (up to ~40 lbs).
- Zone
- The logical partition on your alarm panel where the detector is assigned.
- RF Range
- The maximum wireless distance between sensor and receiver/panel.
Installation & Mounting
- Choose Location: Mount 7.5′ above the floor on a stable wall—avoid windows, HVAC vents, and direct sunlight.
- Mark & Drill: Use included wall anchors and screws—drill pilot holes at 7.5′ height.
- Attach Backplate: Secure the plastic backplate using the two anchors and screws.
- Install Battery: Pull down the screw on the bottom of the cover, open, and insert CR123A battery.
- Snap On Detector: Place the main body onto the backplate and secure with the bottom screw.
- Restore Power: Ensure panel is powered; detector should supervise in seconds.
Programming to Your Panel
Tip: Refer to your panel’s installation guide for “Learn-In” mode.
- Put your panel into sensor enrollment (Installer Toolbox ▶︎ Add Sensor).
- Trigger the detector’s tamper switch by pressing the back cover—panel will show the new zone ID.
- Assign zone type: choose “Interior Follower” for burglary or “Motion” for activity.
- Name the zone (e.g., “Living Room Motion”).
- Save and exit programming—panel will reboot in a few seconds.
Learn more: 2GIG PIR1E-345 Programming Guide
Walk-Test
Verifies proper coverage and RF supervision before finalizing installation.
- On your panel, enter Installer Toolbox ▶︎ Walk Test.
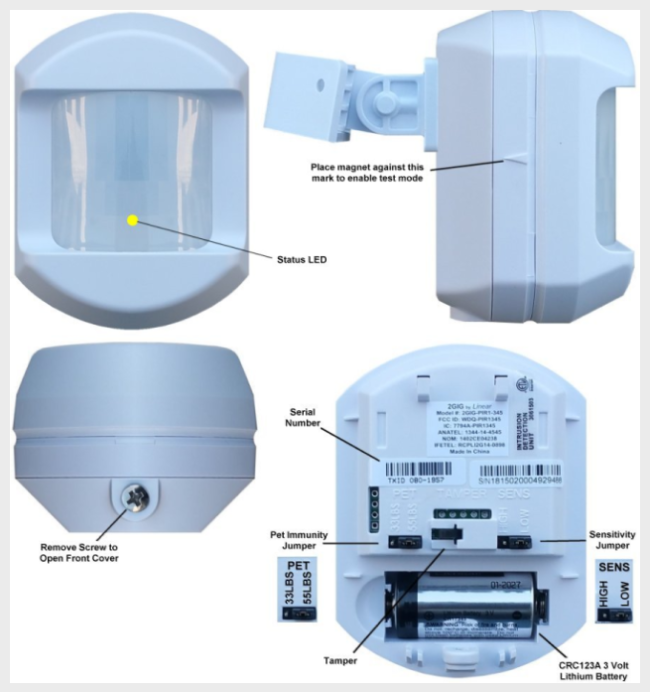
- Open the detector cover and place a magnet over the tamper arrow—LED will flash on motion.
- Stand ~6–8′ from the detector and walk across its field of view—LED should flash once per motion.
- Check all coverage zones; adjust mount angle if any blind spots appear.
- Exit Walk-Test on panel when finished—LED stops flashing.
Pet Immunity Setup
Helps prevent false alarms from small pets.
- Open the cover and locate the two PCB jumpers: SENSITIVITY (right) and PET IMMUNITY (left).
- Leave SENSITIVITY at Low (default) for normal operation.
- Set PET IMMUNITY to Enabled to ignore animals up to ~40 lbs—disable for no immunity.
- Reinstall battery and cover; re-run Walk-Test to confirm detection with pets present.
Advanced Installation Tips
- Avoid Air Currents: Don’t point detector toward fans, vents, or open windows.
- Corner Mounting: Provides wider coverage—mount in a corner 7.5′ high.
- RF Interference: Keep >1 ft from large metal objects, routers, or other electronics.
- Regular Testing: Perform a Walk-Test every 6 months and replace battery if supervision fails.
- Zone Settings: Use Entry/Exit delays on nearby pedestrian doors to avoid nuisance alarms.
Troubleshooting
- No Supervision: Check battery seating and RF range—remount closer to panel or add a repeater.
- False Alarms: Reduce sensitivity, enable pet immunity, and remove nearby heat sources or moving objects.
- No Motion Trigger: Verify Walk-Test LED flashes; adjust mounting angle and height.
- Battery Low: Replace CR123A immediately—system will alert low battery.
LED Indicator Guide
| LED Pattern | Meaning | Action |
|---|---|---|
| Off | Normal idle | None |
| Flash on detection | Walk-Test motion detected | Verify coverage |
| Steady red (during enrol) | Sensor in Learn-In mode | Complete programming |
| No LED on tamper | Cover not removed properly | Re-seat cover and screw |
Reference Manual
For full technical details and advanced configuration, view the official manufacturer’s manual: