Simon XT—Battery Replacement
Summary: This guide provides step-by-step instructions for safely replacing the backup battery in your Simon XT security panel. Proper battery replacement ensures your panel continues to function correctly during power outages. After installation, a new battery may take up to 24 hours to fully charge, and you might need to clear a low battery alert from the panel.
Table of Contents
Navigate through the sections to learn how to replace your Simon XT panel's battery.
- Common Terms
- Battery Specifications & What You'll Need
- Important Safety Precautions
- Video Instructions
- Step-by-Step Battery Replacement Instructions
- Clearing Panel Alerts After Replacement
- Troubleshooting Post-Replacement Issues
- Further Assistance
Common Terms
Understanding these terms will help you during the battery replacement process.
- Simon XT Panel
- Your Interlogix security system's main control unit, featuring an LCD display and physical buttons.
- Backup Battery
- An internal rechargeable battery (typically 6-volt, 1.2 amp-hour for Simon XT) that powers your panel if AC power is lost.
- Phillips Screwdriver
- A type of screwdriver required for the screw(s) securing the panel casing.
- Top Screw / Securing Screw
- A screw, often located on the top or bottom edge of the Simon XT, that helps hold the panel cover to the backplate.
- Tabs
- Latches or clips, usually on the top edge of the Simon XT panel, that must be pressed to release the front cover.
- Front Cover
- The main casing of the panel that houses the display and keypad, which swings open to access internal components.
- Backplate
- The mounting plate fixed to the wall, to which the panel is attached.
- Battery Clips/Holder
- The mechanism inside the panel that secures the battery in place.
- Battery Terminals/Connector
- The points where the battery wires (typically red for positive, black for negative) connect to the battery itself or to a plug that connects to the circuit board.
- Circuit Board
- The main electronic board inside the panel where components like the battery connect.
- Transformer (Power Supply) / AC Power
- The external device that plugs into an electrical outlet and provides the main (AC) power to your panel.
- Status Button
- A button on the panel used to check current system status and any trouble alerts.
- Disarm Button
- Used to deactivate the security system and often to acknowledge or clear trouble alerts after the underlying issue is resolved.
- Trouble Alert
- A notification from the panel about a system issue, such as "AC Power Failure" or "System Low Battery."
Battery Specifications & What You'll Need
Ensure you have the correct battery and tools before you start.
Required Battery:
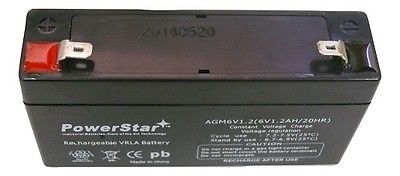
- Type: 6-volt, 1.2 amp-hour (Ah) sealed lead-acid or compatible rechargeable battery. (Double-check your existing battery or panel manual for exact specifications if possible).
This type of battery can often be purchased at local hardware stores, electronics retailers, mass retailers, or specialized battery stores. You may also text a Support Representative at 469-513-8685 to inquire about ordering one.
Tools You Will Need:
- A small to medium Phillips-head screwdriver (for the panel's securing screw).
- Your new 6-volt, 1.2 amp-hour replacement battery.
Important Safety Precautions
Read these safety tips carefully before you begin the battery replacement.
- Disarm Your System: Before starting, ensure your Simon XT panel is fully disarmed.
- Disconnect AC Power First: This is a crucial safety step. Before opening the panel casing, always unplug the panel's AC power transformer from the wall outlet. The panel will likely beep and announce "AC Power Failure"; this is normal.
- Prevent Static Discharge: Before touching any internal components or the new battery, discharge any static electricity from your body by touching a grounded metal object (like an unpainted metal water pipe).
- Handle Batteries Correctly:
- Observe correct polarity when connecting the new battery: typically, the red wire connects to the red (positive, +) terminal and the black wire to the black (negative, -) terminal.
- Do not puncture, crush, short-circuit, or expose the old or new battery to fire or high temperatures.
- Dispose of the old battery according to your local regulations (many retailers offer battery recycling).
- Do Not Force Components: Parts should fit smoothly. If you encounter resistance when opening the panel or connecting the battery, double-check alignment and the instructions.
Video Instructions
Watch these videos for a visual guide on replacing the Simon XT battery. Note that there might be slight variations based on your specific Simon XT version (V1, V1.x, V2).
Simon XT V1 (Example):
Simon XT V2 (Example):
(Note: The video links above are placeholders from the draft and need to be replaced with valid YouTube embed URLs for Simon XT battery replacement if specific Brinks Home videos are available.)
Step-by-Step Battery Replacement Instructions
Follow these instructions to safely replace the backup battery in your Simon XT panel.
-
Disarm System & Unplug AC Power: Ensure your system is disarmed. Then, unplug the panel's power transformer from the wall outlet. The panel will likely beep and announce "AC Power Failure."
-
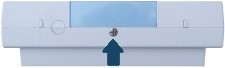
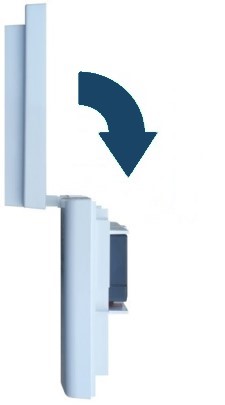
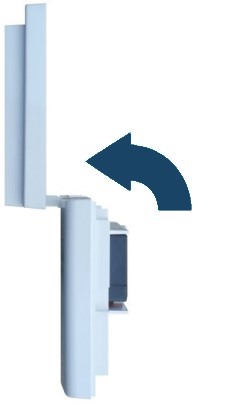
Open the Panel Cover: Locate and remove the small Phillips-head screw that secures the panel cover (often found on the top edge of the Simon XT). Once the screw is removed, press the two tabs located on the top edge of the panel simultaneously. While pressing these tabs, gently pull the top of the front cover forward; it should swing downward, as it's usually hinged at the bottom.
-
Support the Front Cover: Flip the front cover completely down to access the internal components. Some models may have a plastic strap to help support the cover; use it if available.
-
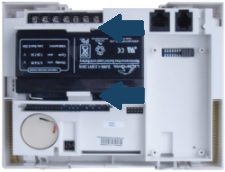
Disconnect and Remove the Old Battery: Locate the backup battery inside. It is usually held in place by plastic clips. Note how the red and black wires are connected to the battery terminals (or to a connector that plugs into the circuit board). Carefully disconnect these wires/connector. Then, apply gentle pressure to spread the battery clips (if present) and lift the old battery out of its compartment.
-
Install the New Battery: Take your new 6-volt 1.2 amp-hour battery. Connect the wires to the new battery terminals, ensuring correct polarity: the red wire connects to the red (positive, +) terminal, and the black wire connects to the black (negative, -) terminal. If it's a plug-in connector, ensure it's oriented correctly and fully seated on the circuit board.
Place the new battery into the compartment and ensure it is secured by the clips or holder.
-
Close the Panel: Carefully swing the front cover up, ensuring no wires are pinched. Press it firmly against the backplate until the top tabs latch securely.
-
Secure and Power Up: Replace the securing screw you removed in step 2. Plug the panel's power transformer back into the electrical outlet. The panel should begin to power up. This may take a few moments for the display to illuminate and the system to initialize.
Note: Once the new battery is installed and AC power is restored, allow up to 24 hours for the new battery to charge fully. During this charging period, the panel may continue to display a "System Low Battery" alert. This is normal.
Clearing Panel Alerts After Replacement
After replacing the battery and restoring power, your panel may show alerts like "AC Power Failure" (from when you unplugged it) or "System Low Battery." Here's how to acknowledge and clear them.
-
After the panel has fully booted, it may be beeping and displaying a trouble condition. Press the Status button. The panel will typically announce or show the specific trouble(s).
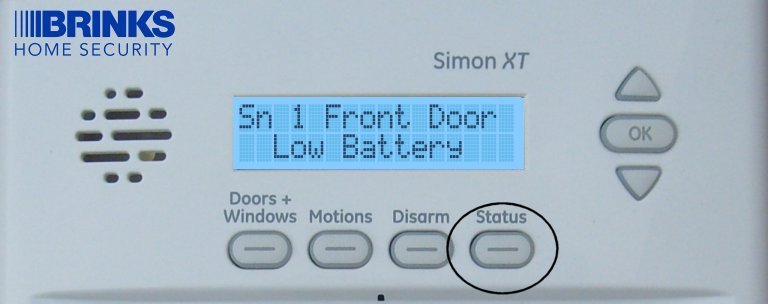
-
To silence the beeping and acknowledge the alert(s), press the Disarm button. You may then be prompted to enter your User Code or Master Code. Enter your code.
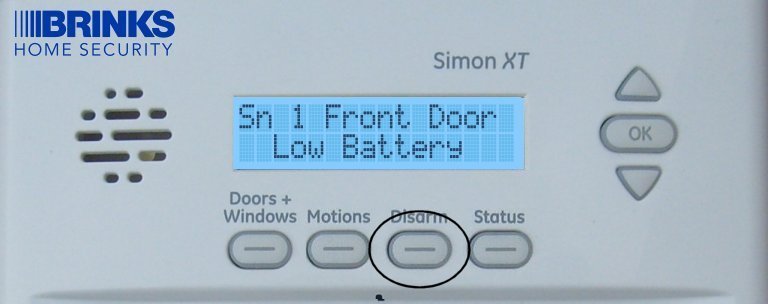
-
This action typically silences the panel for active, resolvable troubles (like AC Loss, once power is restored). The "System Low Battery" alert should clear on its own after the new battery has had sufficient time to charge (up to 24 hours).
If alerts for resolved issues persist beyond a reasonable time, try pressing Status then Disarm + Code again. If a "Low Battery" alert doesn't clear after 24 hours, see the Troubleshooting section.
Troubleshooting Post-Replacement Issues
Addressing common issues that may occur after replacing the Simon XT panel battery.
"System Low Battery" Alert Persists After 24 Hours
- Verify Full Charge Time: Ensure the panel has been continuously powered by its AC transformer for at least 24-48 full hours.
- Check Battery Connections: Power down the panel completely (unplug AC, then disconnect battery). Double-check that the new battery's wires are securely and correctly connected to the battery terminals (red to +, black to -) and that the battery connector is firmly plugged into the panel's circuit board.
- Confirm Correct Battery Type: Ensure the replacement battery is a 6-volt, 1.2 amp-hour (or compatible) battery as specified. An incorrect type may not charge or report correctly.
- Acknowledge Alert Again: Try pressing Status, then Disarm + your code, to see if the system re-evaluates the battery state.
- Potential Faulty New Battery: Although rare, the new battery itself could be faulty and unable to hold a proper charge.
- Panel Charging Circuit Issue: If multiple new, correct batteries fail to resolve the issue, there might be a problem with the panel's internal charging circuitry, which would require professional service.
Panel Does Not Power On After Battery Replacement
- Verify All Power Connections:
- Confirm the new battery is correctly connected inside the panel (polarity and plug).
- Ensure the AC power transformer is firmly plugged into a known working electrical outlet AND that its wire is securely connected to the panel's power input terminals on the backplate (this connection is sometimes disturbed when removing/reinstalling the panel).
- Check Outlet Power: Confirm the electrical outlet supplying the transformer is working by testing it with another device (like a lamp). Also, check for tripped circuit breakers or if the outlet is controlled by a wall switch.
- Try Old Battery (Temporarily, If It Had Some Charge): If your old battery had some residual charge and is not damaged, you could (after unplugging AC power again) temporarily reinstall it to see if the panel powers on. This can help diagnose if the issue is potentially with the new battery being completely dead on arrival.
- If the panel shows absolutely no signs of life (no lights, no screen activity) after checking all connections, there might be an issue with the transformer, the new battery, or an internal panel fault.
Panel Beeps Continuously or Shows Other Trouble Alerts (e.g., "Cover Tamper")
- Acknowledge Alerts: Follow the steps in the "Clearing Panel Alerts After Replacement" section to identify and acknowledge any active alerts.
- Check for Panel Cover Tamper: Ensure the panel's front cover is properly closed and latched securely, and that the top/bottom securing screw is tightened. If the cover isn't perfectly seated, the panel's internal tamper switch may not be engaged, causing a "Cover Tamper" or similar alert. Re-inspect that no wires are pinched and that the cover snaps on evenly.
- Review All Active Alerts: If beeping or troubles persist after acknowledging, press the Status button again to cycle through all current trouble conditions. Address each one systematically. For example, an "AC Power Failure" alert will persist if the transformer is still unplugged or the outlet isn't working.
Further Assistance
How to get more help if you encounter issues during or after the Simon XT battery replacement.
If you have followed these instructions and are still experiencing problems with your Simon XT panel's battery, if alerts persist after allowing 24 hours for charging, or if you are uncomfortable performing any of these steps, please do not hesitate to contact us. You can text a Support Representative any time at 469-513-8685. Please be ready to describe the issue and the steps you have already taken.