How to Set Up a Video Analytics Rule
With the Video Analytics feature, you can become more aware of the activity that is happening on or around your property. You are able to customize the types of alerts you want to be notified of and the type of activity you want to monitor, making your smart home even smarter.
Video Analytics Calibration via the Brinks Home™ App (Powered by Alarm.com)
Video Instructions:
Before creating a Video Analytics rule for your camera, you must first calibrate the camera. Calibration allows the camera to classify people and other detected objects more accurately.
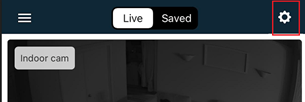
- To calibrate the camera, tap on Video from the Brinks Home Mobile App or the Brinks Home App on a desktop browser home screen.

- Then, tap the settings cog in the top right corner.
- Tap Recording Rules, + Add New Rule, then Video Analytics.
- Select the camera you would like to calibrate by tapping on its video feed.
- A warning will appear stating, “This calibration will delete any VMD schedules you have previously configured. These will be replaced by the new video analytics rules.” Tap OK.
- Once the camera has completed the initial video analytics setup, a message will appear over its video feed prompting you to calibrate the camera. Tap on the video feed to start the calibration process.
- Read the recommendations before proceeding. You will be asked to take a series of photos from the camera.
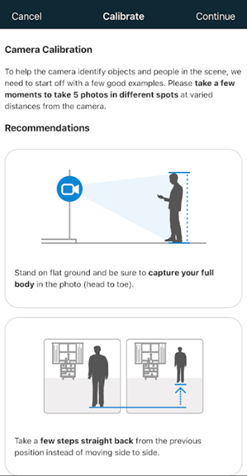
- Make sure to capture your entire body in the photos and move straight back from the camera rather than side to side.
- Once you’re ready to start, tap Continue on the top right corner of the screen.
- After starting calibration, move into the camera’s field of view.
- Take 5 photos of yourself from varied distances from the camera by tapping Take Photo underneath the video feed.
- Once all 5 photos have been taken, tap Submit on the top right corner. The page may take a moment to load.
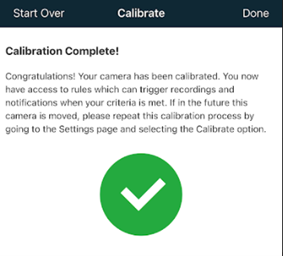
- After calibration is complete, the camera is ready to configure video analytic rules.


• The camera will process an update to prepare for video analytics support. This may take a few minutes.
• Once the initial setup is complete, you will see a success message. Tap close on the bottom right to continue.


Configuring Video Analytics Using a Desktop Browser
- Log in to the Brinks Home Desktop App.
- Click Video.
- Click Recording Rules.
- Click Add Rule.
- In the New Video Recording Rule window, select Video Object Detection.

Rule Selection:
- Click to select the desired camera.
- Click to select the rule type:
- • Use a Tripwire rule for when you are wanting to keep an eye on objects passing through the camera’s field of vision or when the objects enter and exit an area.
- • Use a Ground Zone rule when you’re wanting to monitor loitering-types of activity.

- Make sure to delete Video Motion Detection (VMD) schedules associated with the camera you are using to set up a Video Object Detection Rule. Click OK to continue after prompted with this warning.

Camera Scene Set Up:
- Set the scene to indoors or outdoors, based on what the camera is pointing at.
- The Minimum Object Detection Size slider determines the minimum size of objects detected by the rule.
• The camera should be marked outdoors if it will be exposed to rain, snow, spider webs, or moving trees and set to indoors if in a controlled outdoor environment (e.g., a screened-in porch).
Note: This setting is specific to a camera, not a rule, and must be the same for all rules on a camera.
• When set to Very Large, there will be fewer triggers, as it will only detect larger objects and ignore smaller ones. Very Small detects additional smaller objects.
Important: It is recommended to keep this at its suggested value upon initial rule creation.
 Configure Rule – Ground Zone:
A video walkthrough is provided, or read below for step-by-step instructions:
- Give the rule a name to help reference it later (e.g., Front door recording).
- Define the area of interest. Draw a shape covering only the ground where the target’s feet will loiter.
- Double-click inside the camera’s field of view to draw a new shape from scratch.
- Click and hold inside the shape to move it around.
- Hold right-click to rotate the shape.
- Set the duration inside the area of interest. Customize the time a target must remain inside the drawn shape before notifying you and recording a clip.

Configure Rule – Tripwire:
A video walkthrough is provided, or read below for step by step instructions:
- Give the rule a name to help reference it later (e.g., Hallway crossing).
- Draw the tripwire covering only the ground where the target’s feet will cross.
- Select which direction to monitor the flow of traffic, or choose to monitor in both directions.
Note: Targets will be monitored when moving in the direction of the tripwire’s arrow.

Rule Scheduling and Notifications:
- Select whether the rule should be active at all times or only during specific days/times, along with any exceptions.
- Set the minimum time delay between clips. The shortest duration of time the rule will activate during times of constant movement.
- Select the types of objects that must appear in a clip to trigger a notification. A clip will still be recorded when any object type violates your rule.
Note: This option is solely used for sending notifications and will not alter which clips are recorded.
- Choose how to receive notifications. It is recommended to push notifications to your phone using the dropdown option to attach a thumbnail.

Ensuring Rule Accuracy:
- Avoid intersecting tripwires or overlapping ground zones with objects that are prone to movement, such as trees, bushes, or other objects that move in the wind.
- Only draw the rule where the feet or wheels of an object will cross.
- Do not increase the size of the loiter zone or tripwire to cover the whole of the target.
- Do not include furniture, walls, trees, or other structures in the rule.
- After observing what the rule detects over a few days, consider adjusting the Minimum Object Detection Size slider.
- Increasing the size will help to reduce false detection.
- Decreasing the size helps detect smaller targets.
Viewing the Video Clips:
To view video clips using your Brinks Home app:
- Log into the Customer app.
- Tap
 the menu icon in the upper right-hand corner.
 - Tap Video.
- Tap Saved.
- Any clips with a valid person, vehicle, or animal classification appear here by default. To see clips only with a specific classification, or clips without a standard classification, change the selection in the Filtered Results dropdown menu.