Kwikset 620 Smart Door Lock Guide
Specifications
- • ANSI/BHMA: grade 2 certified
- • Adjustable backset: 2-3/8" to 2-3/4" to fit all standard door preparations
- • Deadbolt latch: round corner faceplate
- • Deadbolt: round strike
- • Deadbolt throw: 1 inch
- • Battery requirements: 4 AA batteries, included
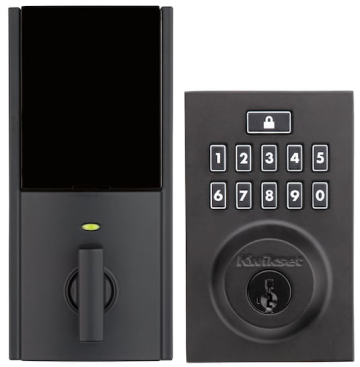
Features
- • Expanding your security system solution with Home Connect technology, your keyless entry lock will now communicate wirelessly to security and home automation systems via Z-Wave
- • SmartKey Security™ protects against advanced break-in techniques and allows you to re-key your lock yourself in seconds
- • 2 keys included with purchase
- • Locking mechanism functions with turn piece on the interior of the lock
- • Keypad stays lit for 30 seconds after inactivity
- • Multiple pre-defined auto-locking settings available
- • Easily installs in minutes with just a screwdriver
Step-by-Step Instructions:
1. Prepare the door and check the dimensions. This device is not compatible with doors configured to accept rim locks, mortise locks, or integrated interior locks.
- a. The hole in the door must be 2-1/8" (54mm) or 1-1/2" (38mm).
- b. The backset (space from the edge of the door to the center of the hole) must be 2-3/8" (60mm) or 2-3/4" (70mm).
- c. The hole for the deadbolt in the edge of the door must be 1" (25mm).
- d. The door must be between 1-3/8" (35mm) to 2" (51mm) thick.
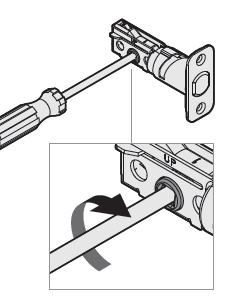
2. Install the latch and strike. To extend the latch bolt, you may use a Phillips head screwdriver, turning the latch clockwise as shown:
3. Install the exterior keypad, ensuring the cable runs underneath the latch.
4. Install the interior assembly, ensuring a tight cable connection.
5. Install 4 AA batteries in the battery pack.
6. Add the lock to your smart home system. The following links provide detailed instructions on adding a Z-Wave device to some of our most common panels:
- IQ Panel 2 - Add Z-Wave Device – Help Center (brinkshome.com)
- GC2 GoControl - Add Z-Wave Device – Help Center (brinkshome.com)
- Simon XT - Add Z-Wave Device – Help Center (brinkshome.com)
- Simon XTi - Add Z-Wave Device – Help Center (brinkshome.com)
7. Add user codes, preferably done through your panel.
8. Test the lock and check door alignment.
9. Install the interior cover.
For additional information relating to your device, click the following link to view the original manufacturer's user guide or installation manual: Kwikset 620 Door Lock Manual