How to Install a Door/Window Sensor
This brief instructional video demonstrates how to successfully install wireless door/window sensors:
Step-by-Step Instructions:
- Open your sensor, insert batteries, then replace the cover.

- Identify the alignment markings on the contact—the markings need to line up to close the circuit.

Note: alignment markers may vary in appearance.
- Find a place on the door or window that is out of reach of children and pets.
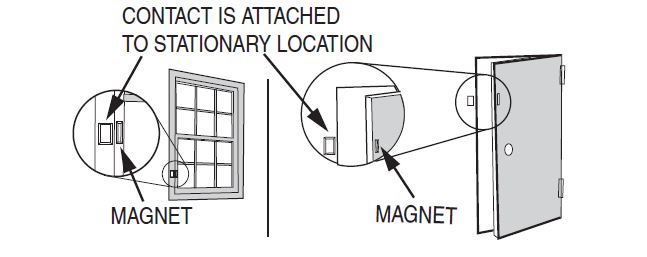
- Clean the location on the door. Prepare to place the sensor on the side with the doorknob.

- Place a strip of double-sided tape directly on the back of the magnet and contact.
- Place the magnet (smaller piece) on the door and the contact (larger piece) on the frame. Make sure there's no more than a quarter-inch of space between the two pieces, approximately the width of a pencil.
- Allow 60 seconds for the double-sided tape to stick.
- Repeatedly open and close the door to make sure the pieces don't fall, hit one another, or shift positions.
Once the installation is complete, you will need to program the sensor. See below for links to the instructions, separated by panel type.
Programming a Door/Window Sensor
Select the image below that resembles your panel.


If Your Device Is Unlisted
- For additional panels not shown here, click here to search for directions by the panel name.
- For other sensor installation instructions, refer to your specific sensor's guide, which can be found here.
- If your panel or sensor is not represented, refer to instructions included with your device, or you can text a Support Representative any time at 469.513.8685.
Best Practices
- Gather all materials required: the door/window sensor & magnet, batteries and double-sided tape.
- Door/window contacts consist of a sensor contact and a magnet. The contact part should be installed on the frame, and the magnet should be installed on the door or window.
- • If the frame and closed door or window are flush, it is recommended you place the contact at the top of the frame, set at least a few inches away from the side of the door.
- • If the door or window is slightly recessed from the frame when closed, you can pad the magnet with extra thick double sided tape or adhesive foam strips.
- • If the door is recessed in several inches, you can place the larger part of the sensor on the door with the arrow facing up towards the frame. Then place the smaller piece on the frame with the top facing the arrow on the larger piece.